Adding an instance and installing Agent
Attention
The user with view-only rights does not have permission to add an instance.
To add a new instance and install Agent:
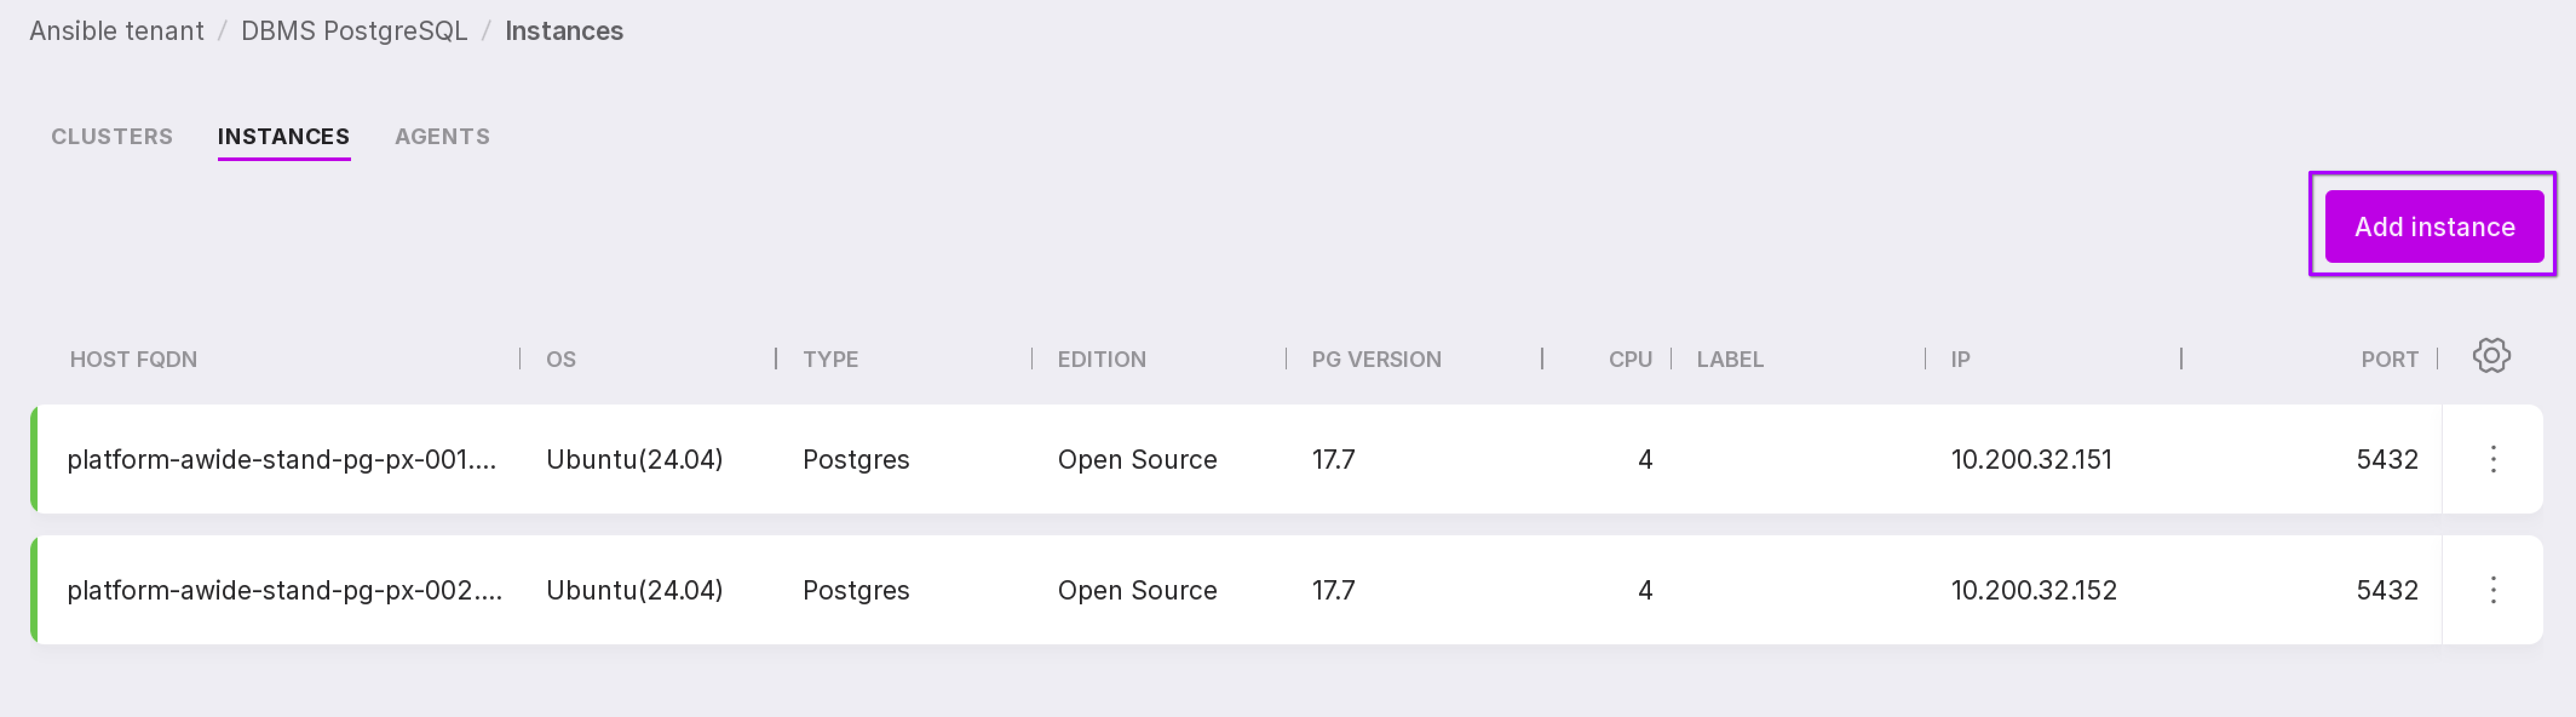
Go to Platform “Instances” page.
Click “Add instance”.
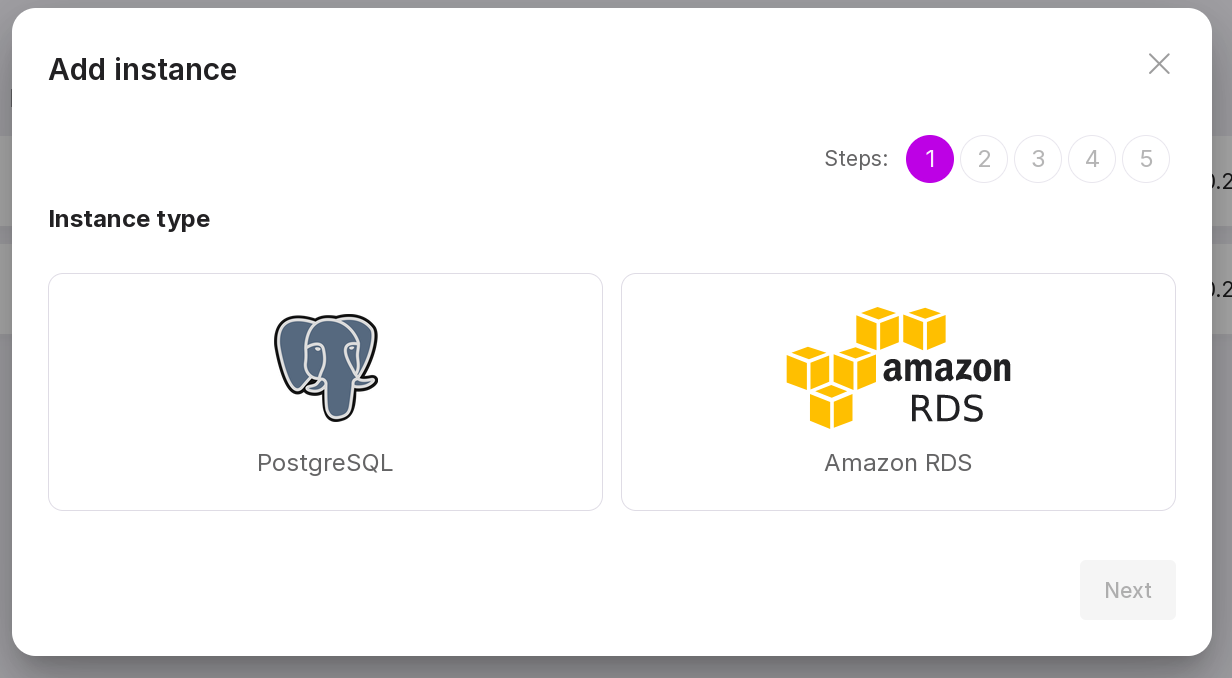
Select the instance type.
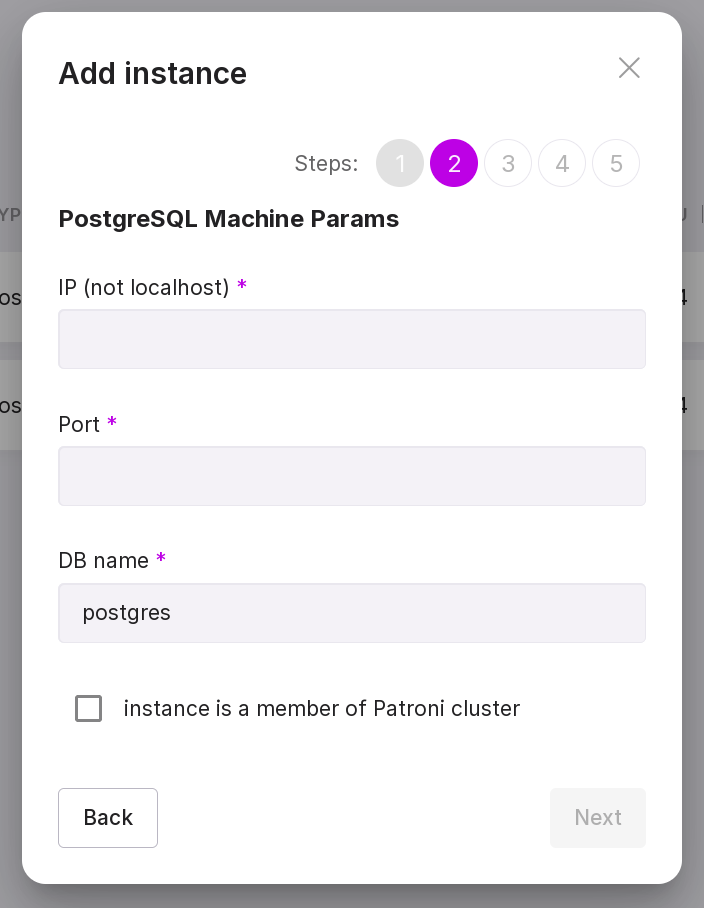
Specify the server parameters:
IP — IP address of Platform database server;
Port — 5432;
DB Name - postgres (default value).
Note
To create a cluster Patroni check the checkbox and add the REST API port.
Click “Next” to continue.
Select your Linux distribution from the dropdown list.
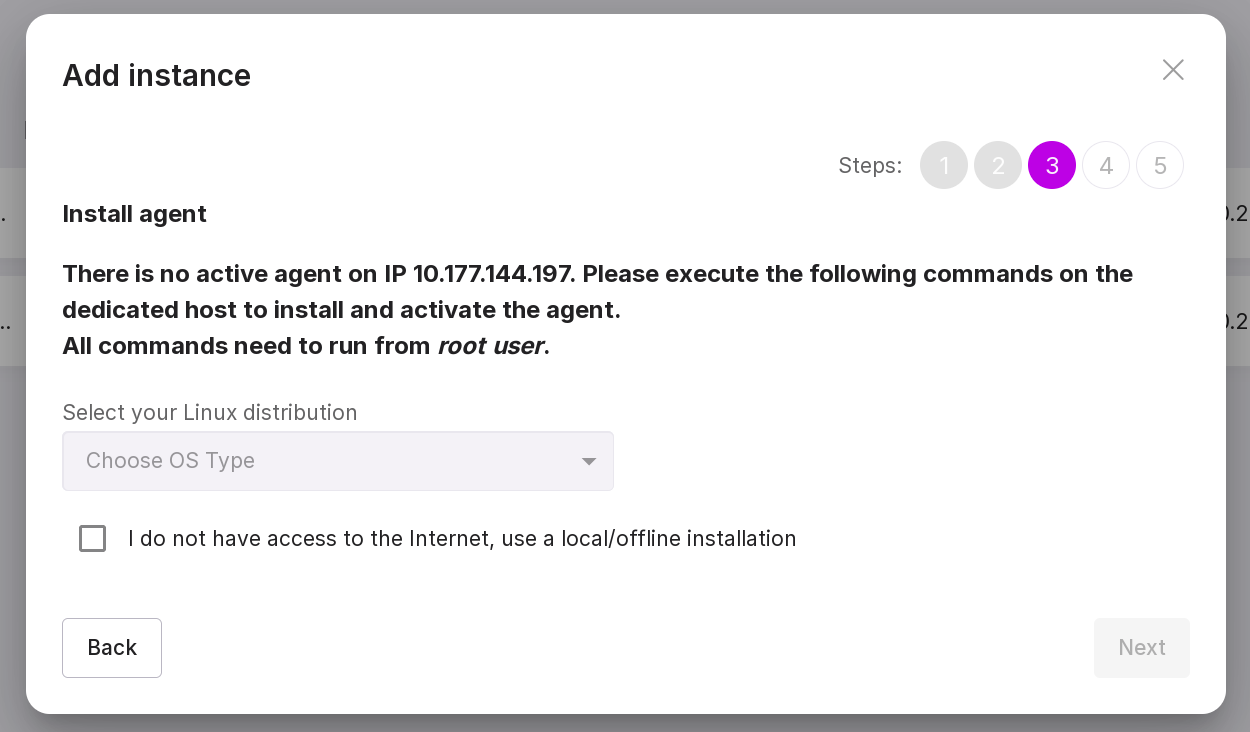
If you want to install Agent without an internet connection (via a local archive), check the box “I do not have access to the internet, use local/offline installation”.
After selecting the distribution, commands for installing and configuring Agent will appear. Log in to the database server where Agent will be installed as a user from the sudo group. To install Agent package, copy the command from the “Download and install the Agent” line. Paste the copied command into the command line interface and run it in the terminal.
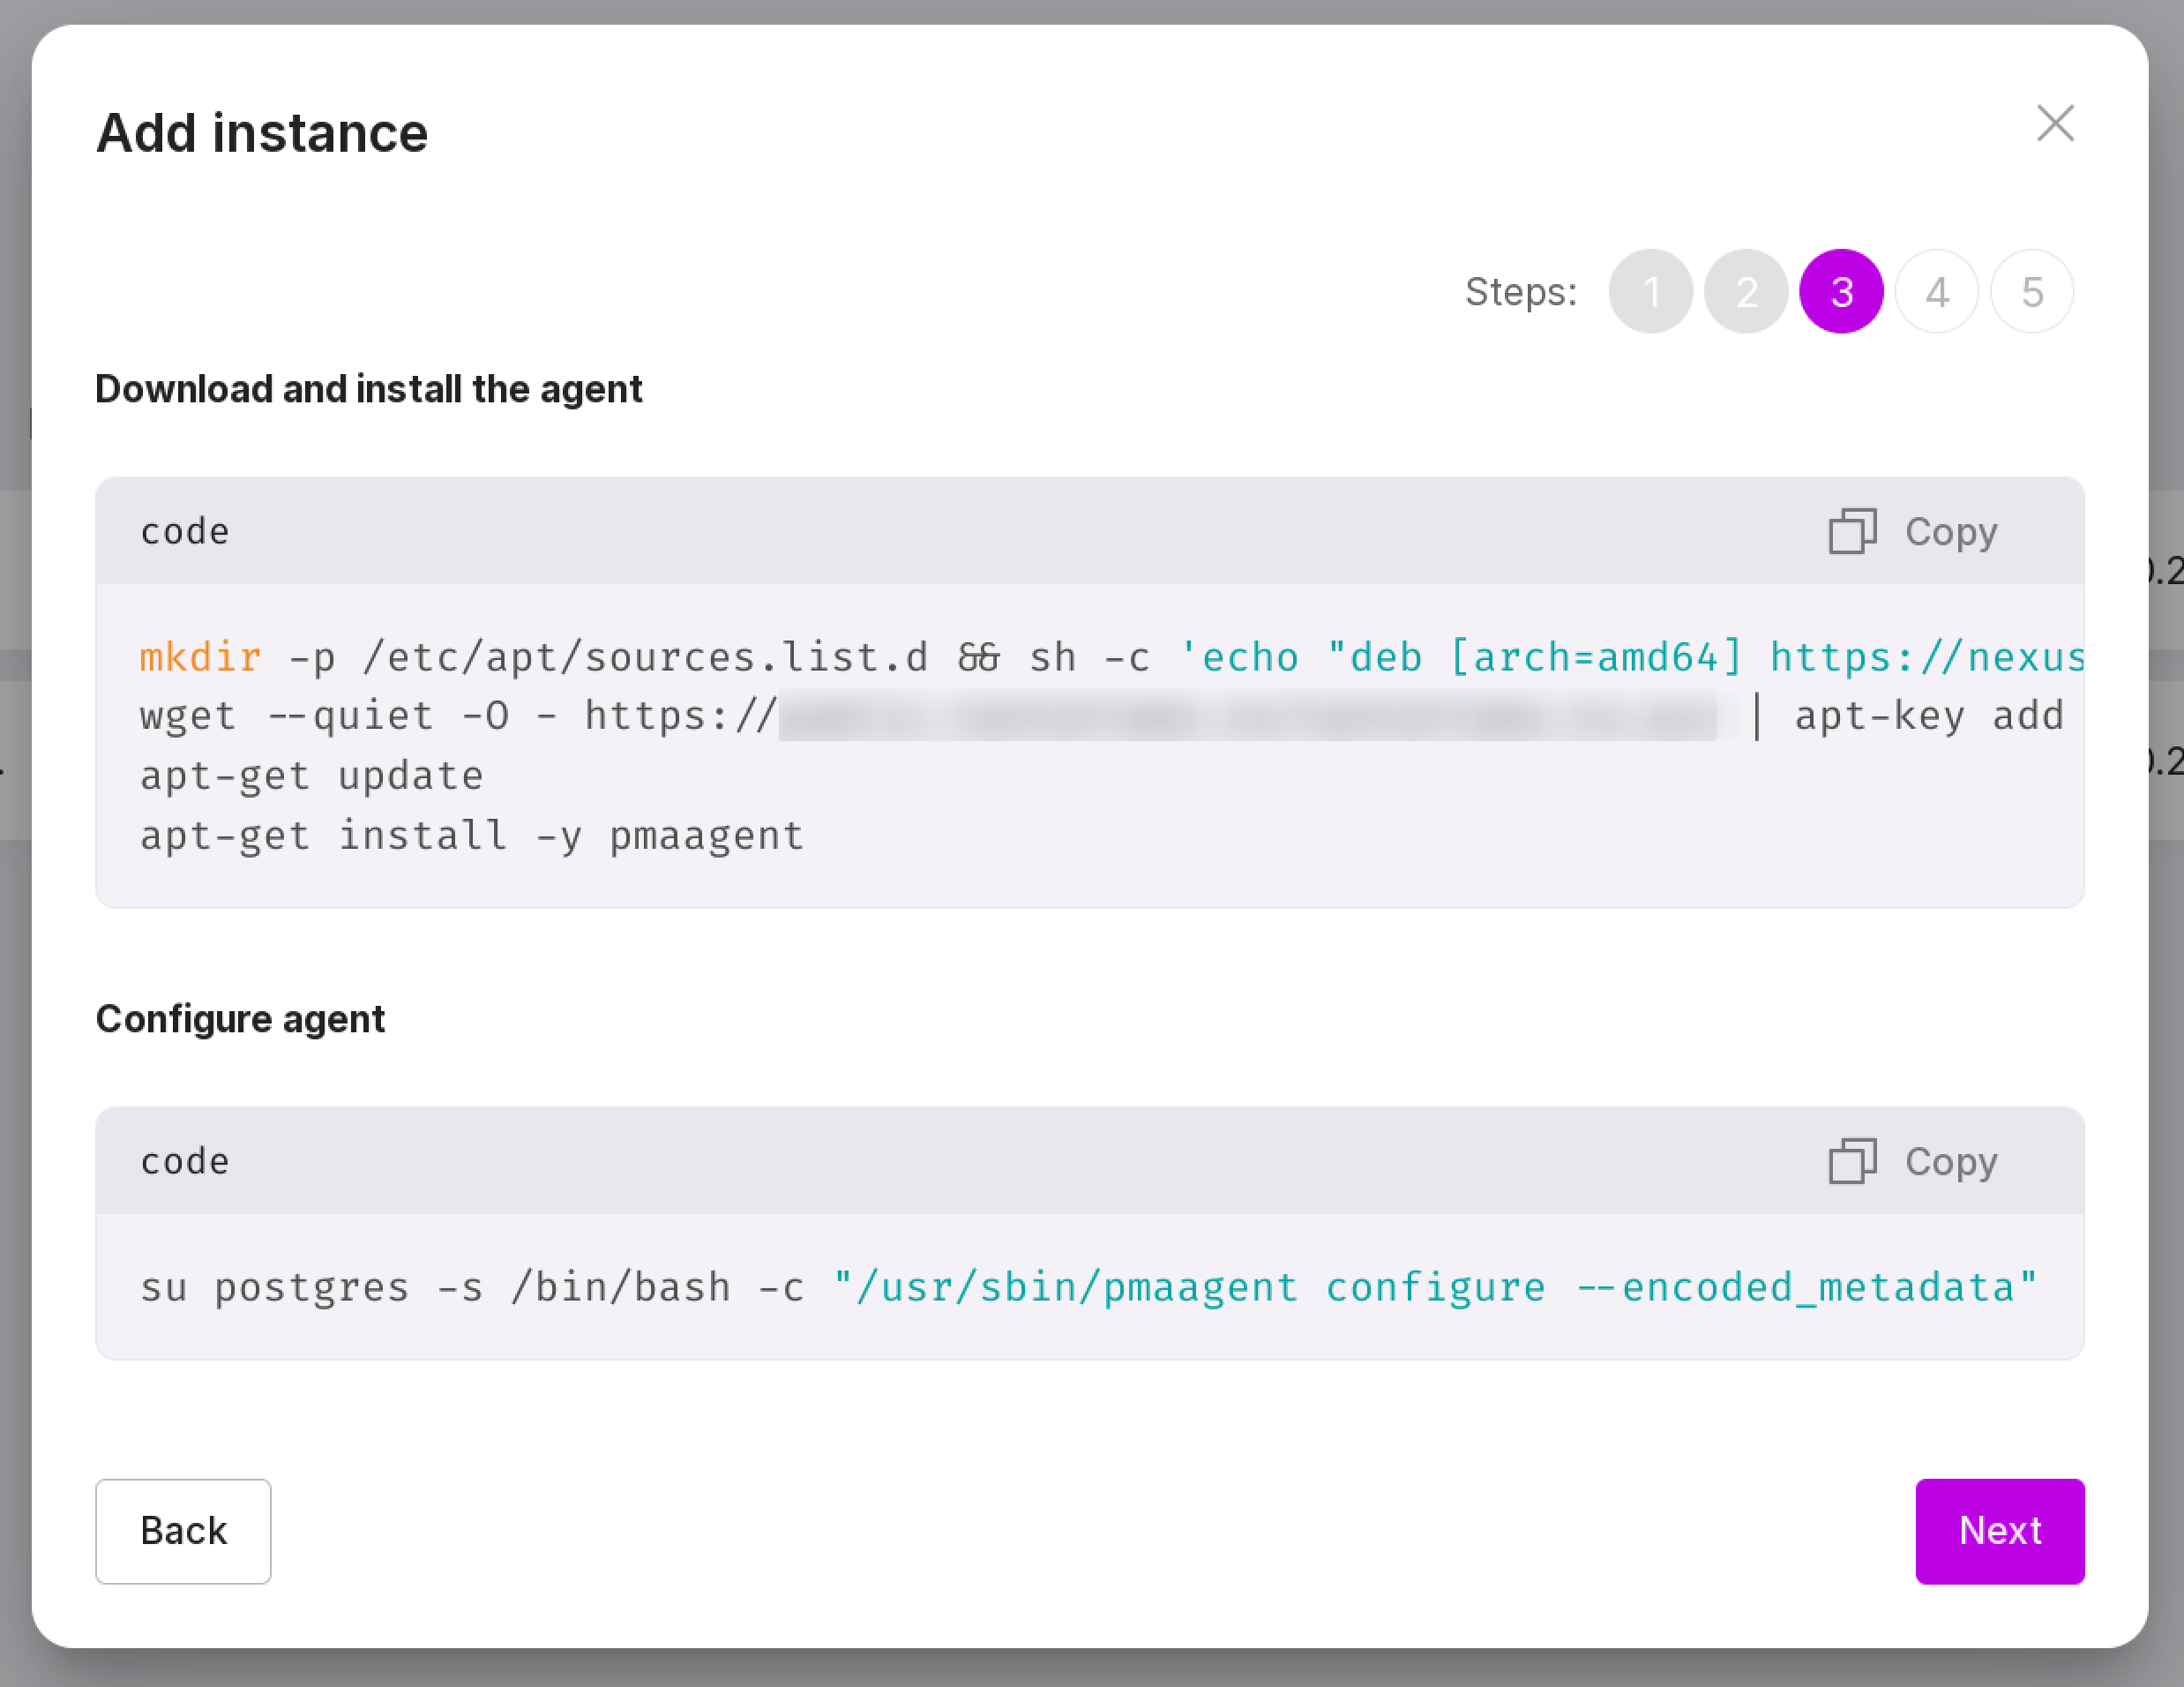
To configure the installed Agent, copy the command from the “Configure Agent” line. Paste the copied command into the command line interface and run it in the terminal.
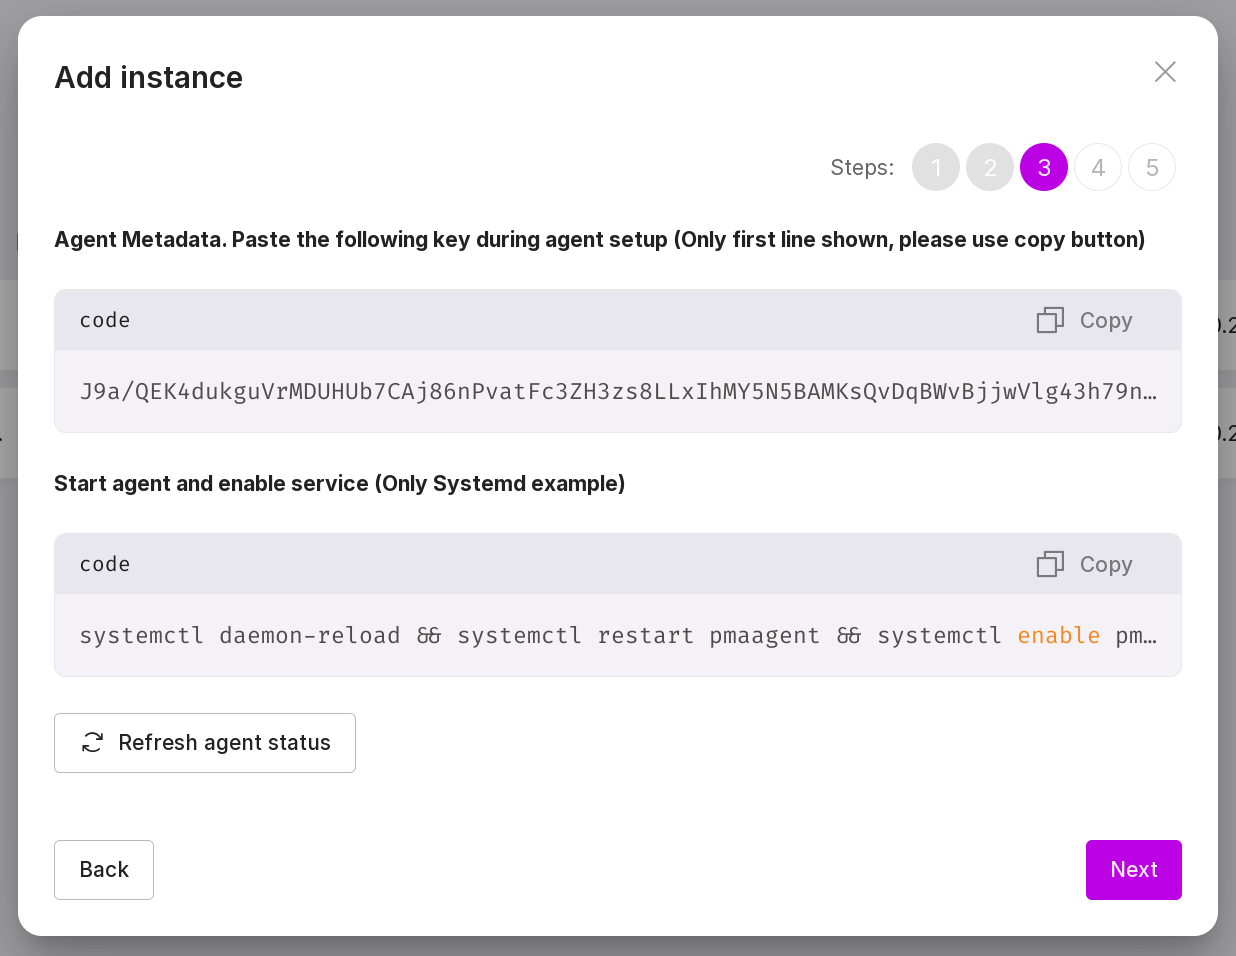
The system will prompt you to enter Agent metadata from the user interface. Copy it from the “Agent Metadata” line. Paste the copied data into the terminal and press Enter:

To restart system resources and start Agent, copy the commands from the “Start Agent and enable service” line. Paste the copied commands into the command line interface and run them in the terminal.
After the installation is successfully completed, click “Next” on the user interface page to continue.
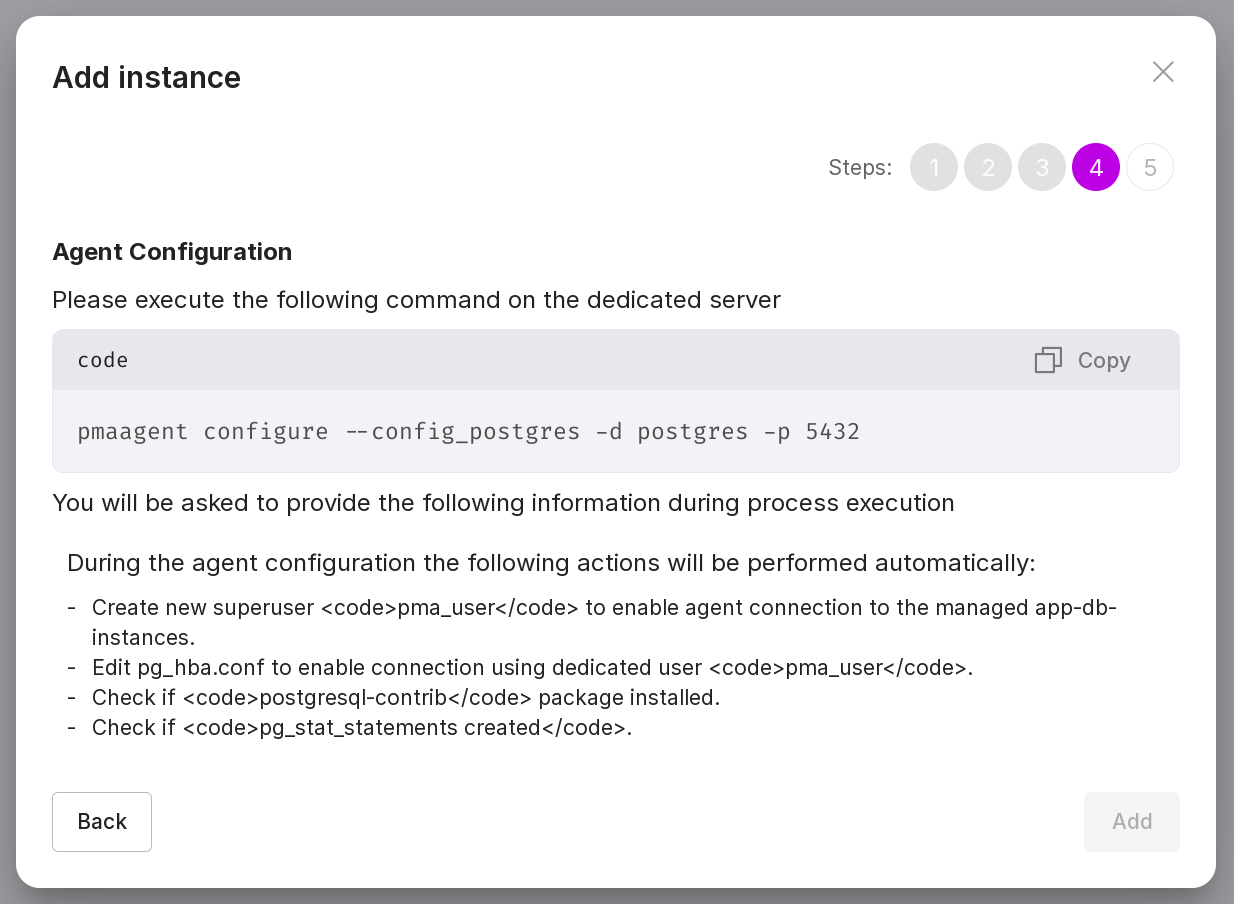
Copy the command from the user interface:
Note
“pmaagent instances add –help” — help information for adding an instance. Example usage:
pmaagent instances add --help
Add instance

Usage:
pmaagent instances add [flags]

Flags:
    --aws-access-key-id string          AWS Access Key ID (https://docs.aws.amazon.com/general/latest/gr/aws-sec-cred-types.html).
                                        AWS RDS instance only.
    --aws-secret-access-key string      AWS Secret Access Key. AWS RDS instance only.
-y, --confirm                           Auto confirm all dialogs and command line interactions
    --container-host string             Published container host (https://docs.docker.com/engine/reference/commandline/port)
    --container-port uint16             Published container port
    --container-target-id string        Target managed/monitored container identifier (minimum 12 symbols)
-w, --db-admin-pass string              PostgreSQL database admin user password
-u, --db-admin-user string              Connect to the monitored PostgreSQL instance as specified admin database user.
                                        It should have privileged access credentials (default "postgres")
    --db-client-cert string             PostgreSQL client cert path
    --db-client-key string              PostgreSQL client key path
    --db-client-key-passphrase string   PostgreSQL client's key passphrase
    --db-host string                    PostgreSQL instance server host or unix socket dir
-d, --db-name string                    Monitored database name (default "postgres")
-W, --db-pass string                    PostgreSQL database user password
-p, --db-port uint16                    PostgreSQL instance server port (default 5432)
    --db-root-ca string                 PostgreSQL root ca path
-U, --db-user string                    Connect to the monitored PostgreSQL instance as specified database user.
                                        It should have privileged access credentials (default "pma_user")
-e, --environment string                Environment type. Possible values: ["CONTAINER" "SERVER" "RDS"] (default "SERVER")
-h, --help                              help for add
    --name string                       Instance name
    --patroni-client-cert string        Patroni client cert path
    --patroni-client-key string         Patroni client key path
    --patroni-cluster-hosts strings     The Patroni list includes the names of the cluster instance hosts or their IP addresses.
    --patroni-host string               Patroni instance host name or IP address
    --patroni-passphrase string         Patroni client's key passphrase
    --patroni-password string           Patroni instance user password
-P, --patroni-port uint16               Patroni instance port
    --patroni-root-ca string            Patroni root ca path
    --patroni-ssl                       Use SSL to connect to the Patroni instance (default false)
    --patroni-user string               Patroni instance user name
-s, --stdout                            Send logging information to stdout. The default is the file destination specified in the configuration file
    --type string                       Instance type: ["PostgreSQL" "AwideDB" "RDS"] (default "PostgreSQL")

Global Flags:
-c, --config-file string   Path to the configuration file (default "/var/lib/pma/agent/agent.yml")
Insert the command into the command line interface on the database server of Platform and press Enter.
Sequentially perform the following actions:
Type in value “proceed.” It will display:
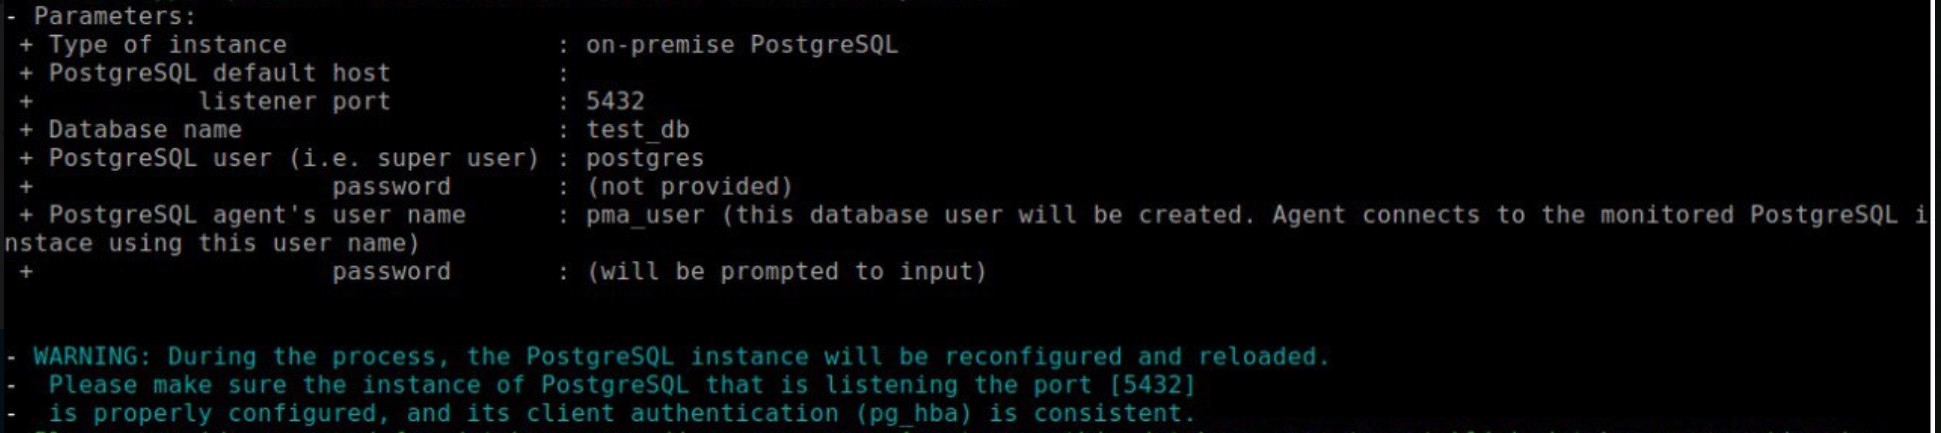
To administer the PostgreSQL instance, Platform will create the user pma_user. At this step, define and specify a password for this user. The password will be used to connect to PostgreSQL. The password is stored only on this server and is invisible in Platform. The agent uses this user to collect metrics and perform all necessary actions for managing the PostgreSQL instance:
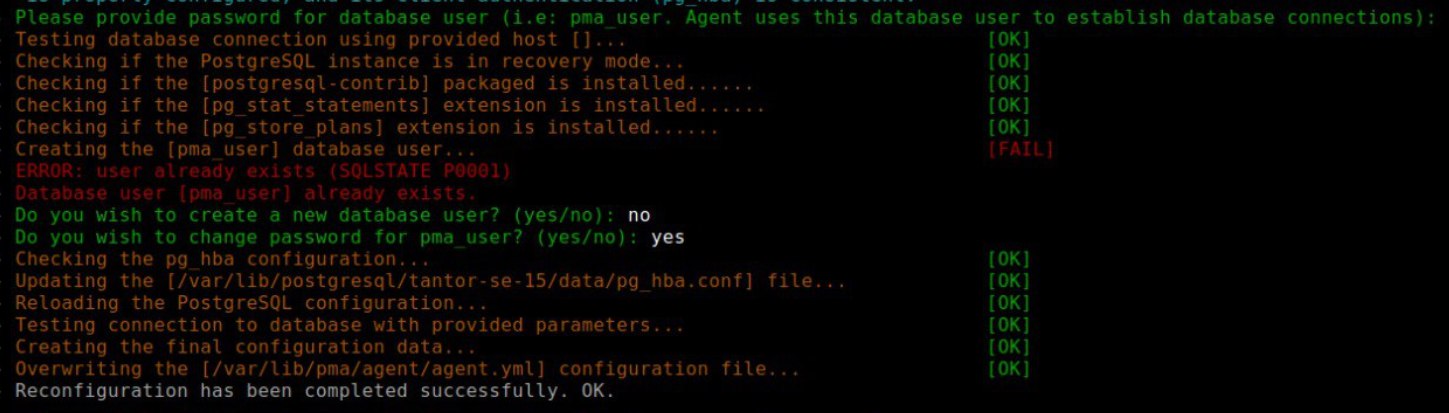
Warning
Superuser data is needed only once for full setup and for the server to reread configuration files after installation is complete.
Superuser credentials are not stored.
For the Patroni cluster, enter the username and password for Patroni:
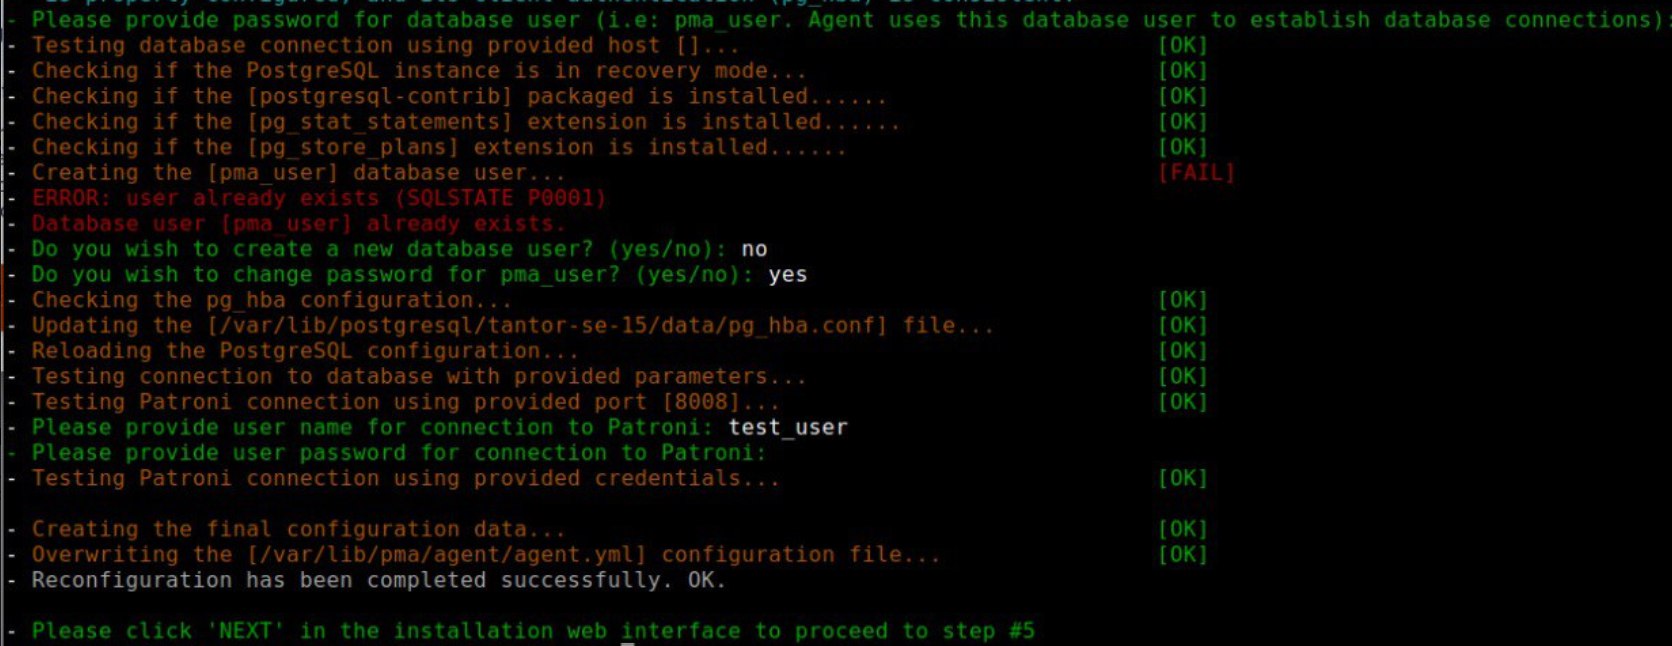
After completing the installation in the command line interface, click “Next” on the user interface page to continue.
Check the instance data found and click “Finish”. The new instance will appear in the list.
Wait for Platform to collect information on the new instance. Collecting information may take 5-10 minutes. Select the new instance from the list to check the installation result. Repeat all steps if you need to add new instances.