The “Tasks” page
On the “Tasks” page, you can create and manage tasks.
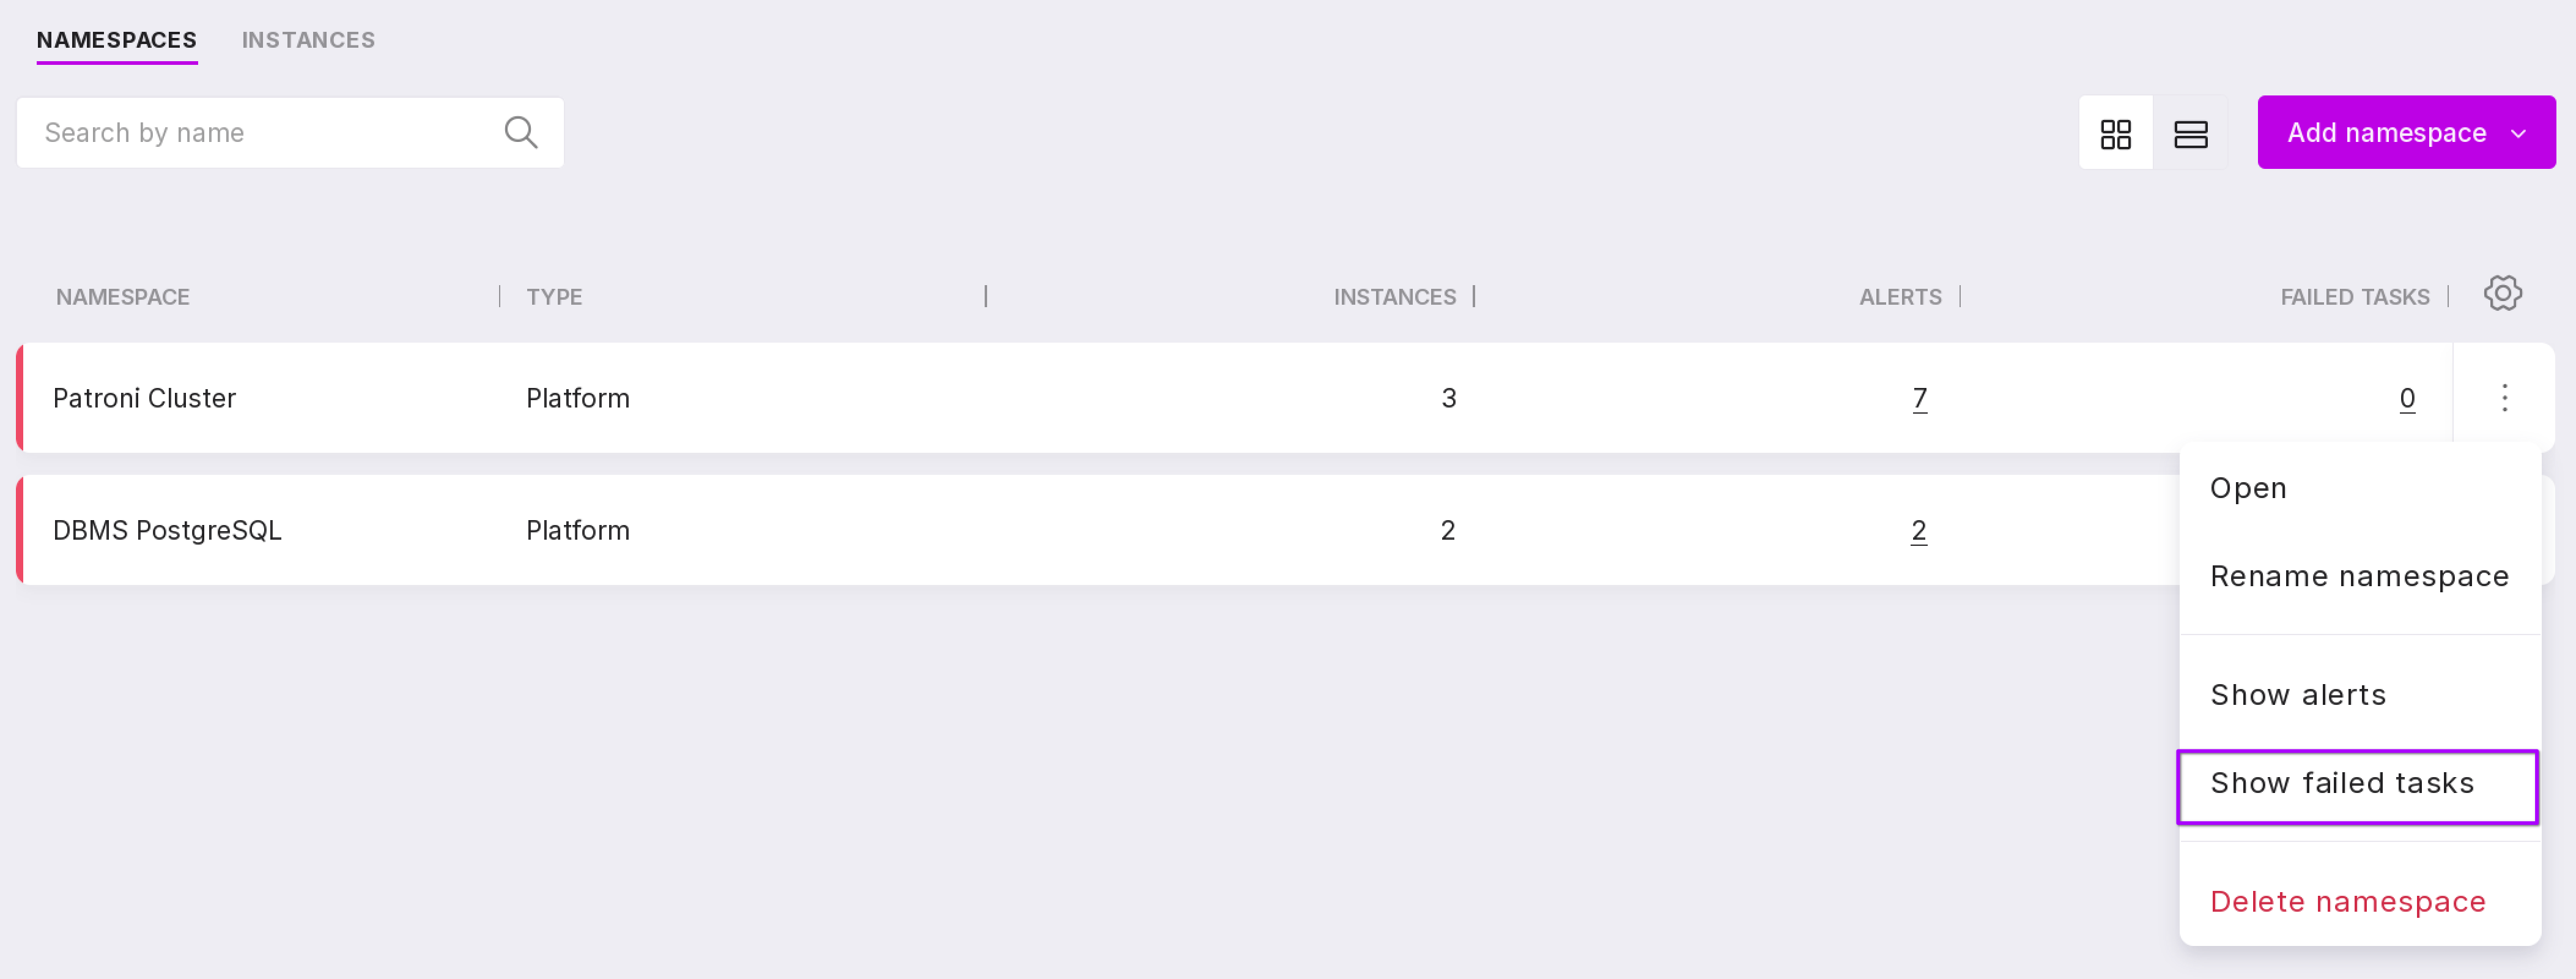
You can open the “Tasks” page in the following ways:
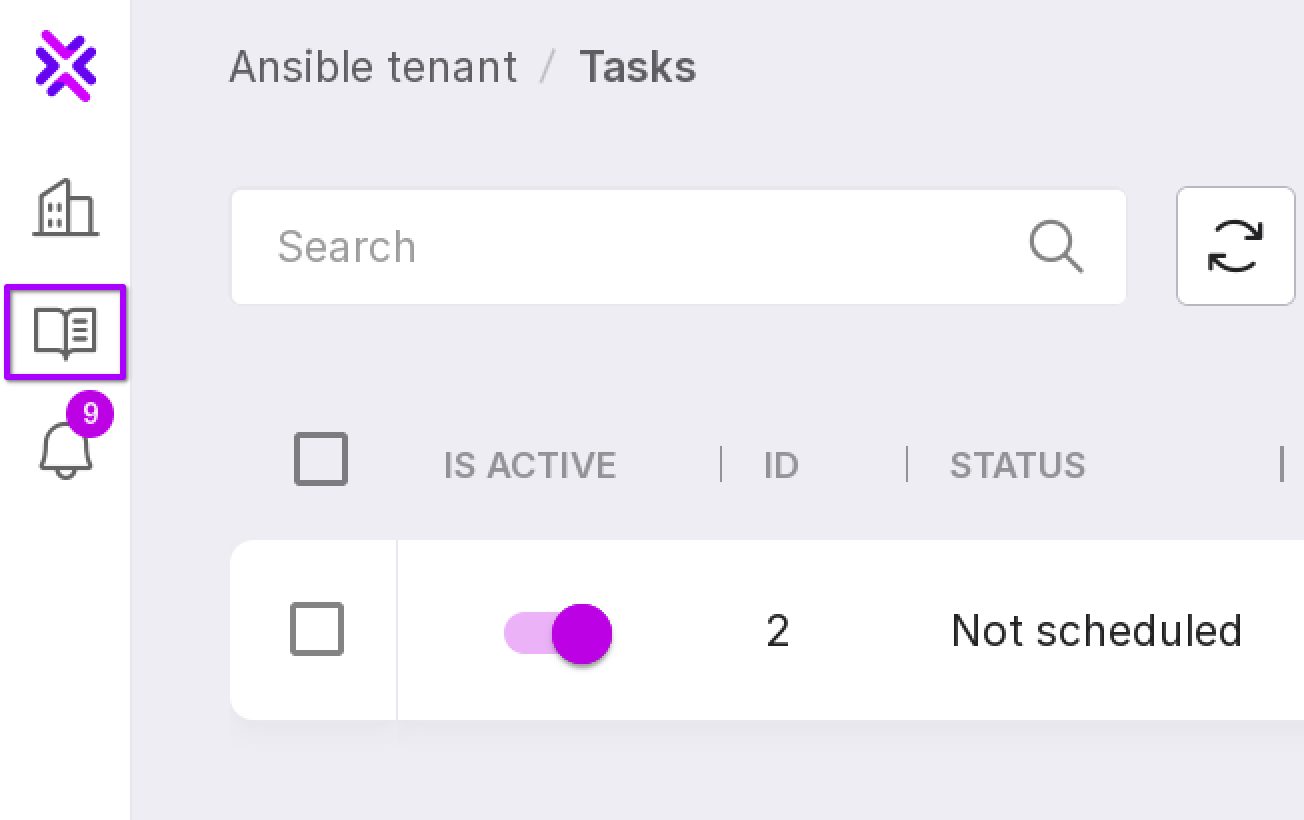
Select “Show failed tasks” in the namespace menu (number 1 in the image below) or click on the icon at the bottom of the namespace (number 2 in the image below).
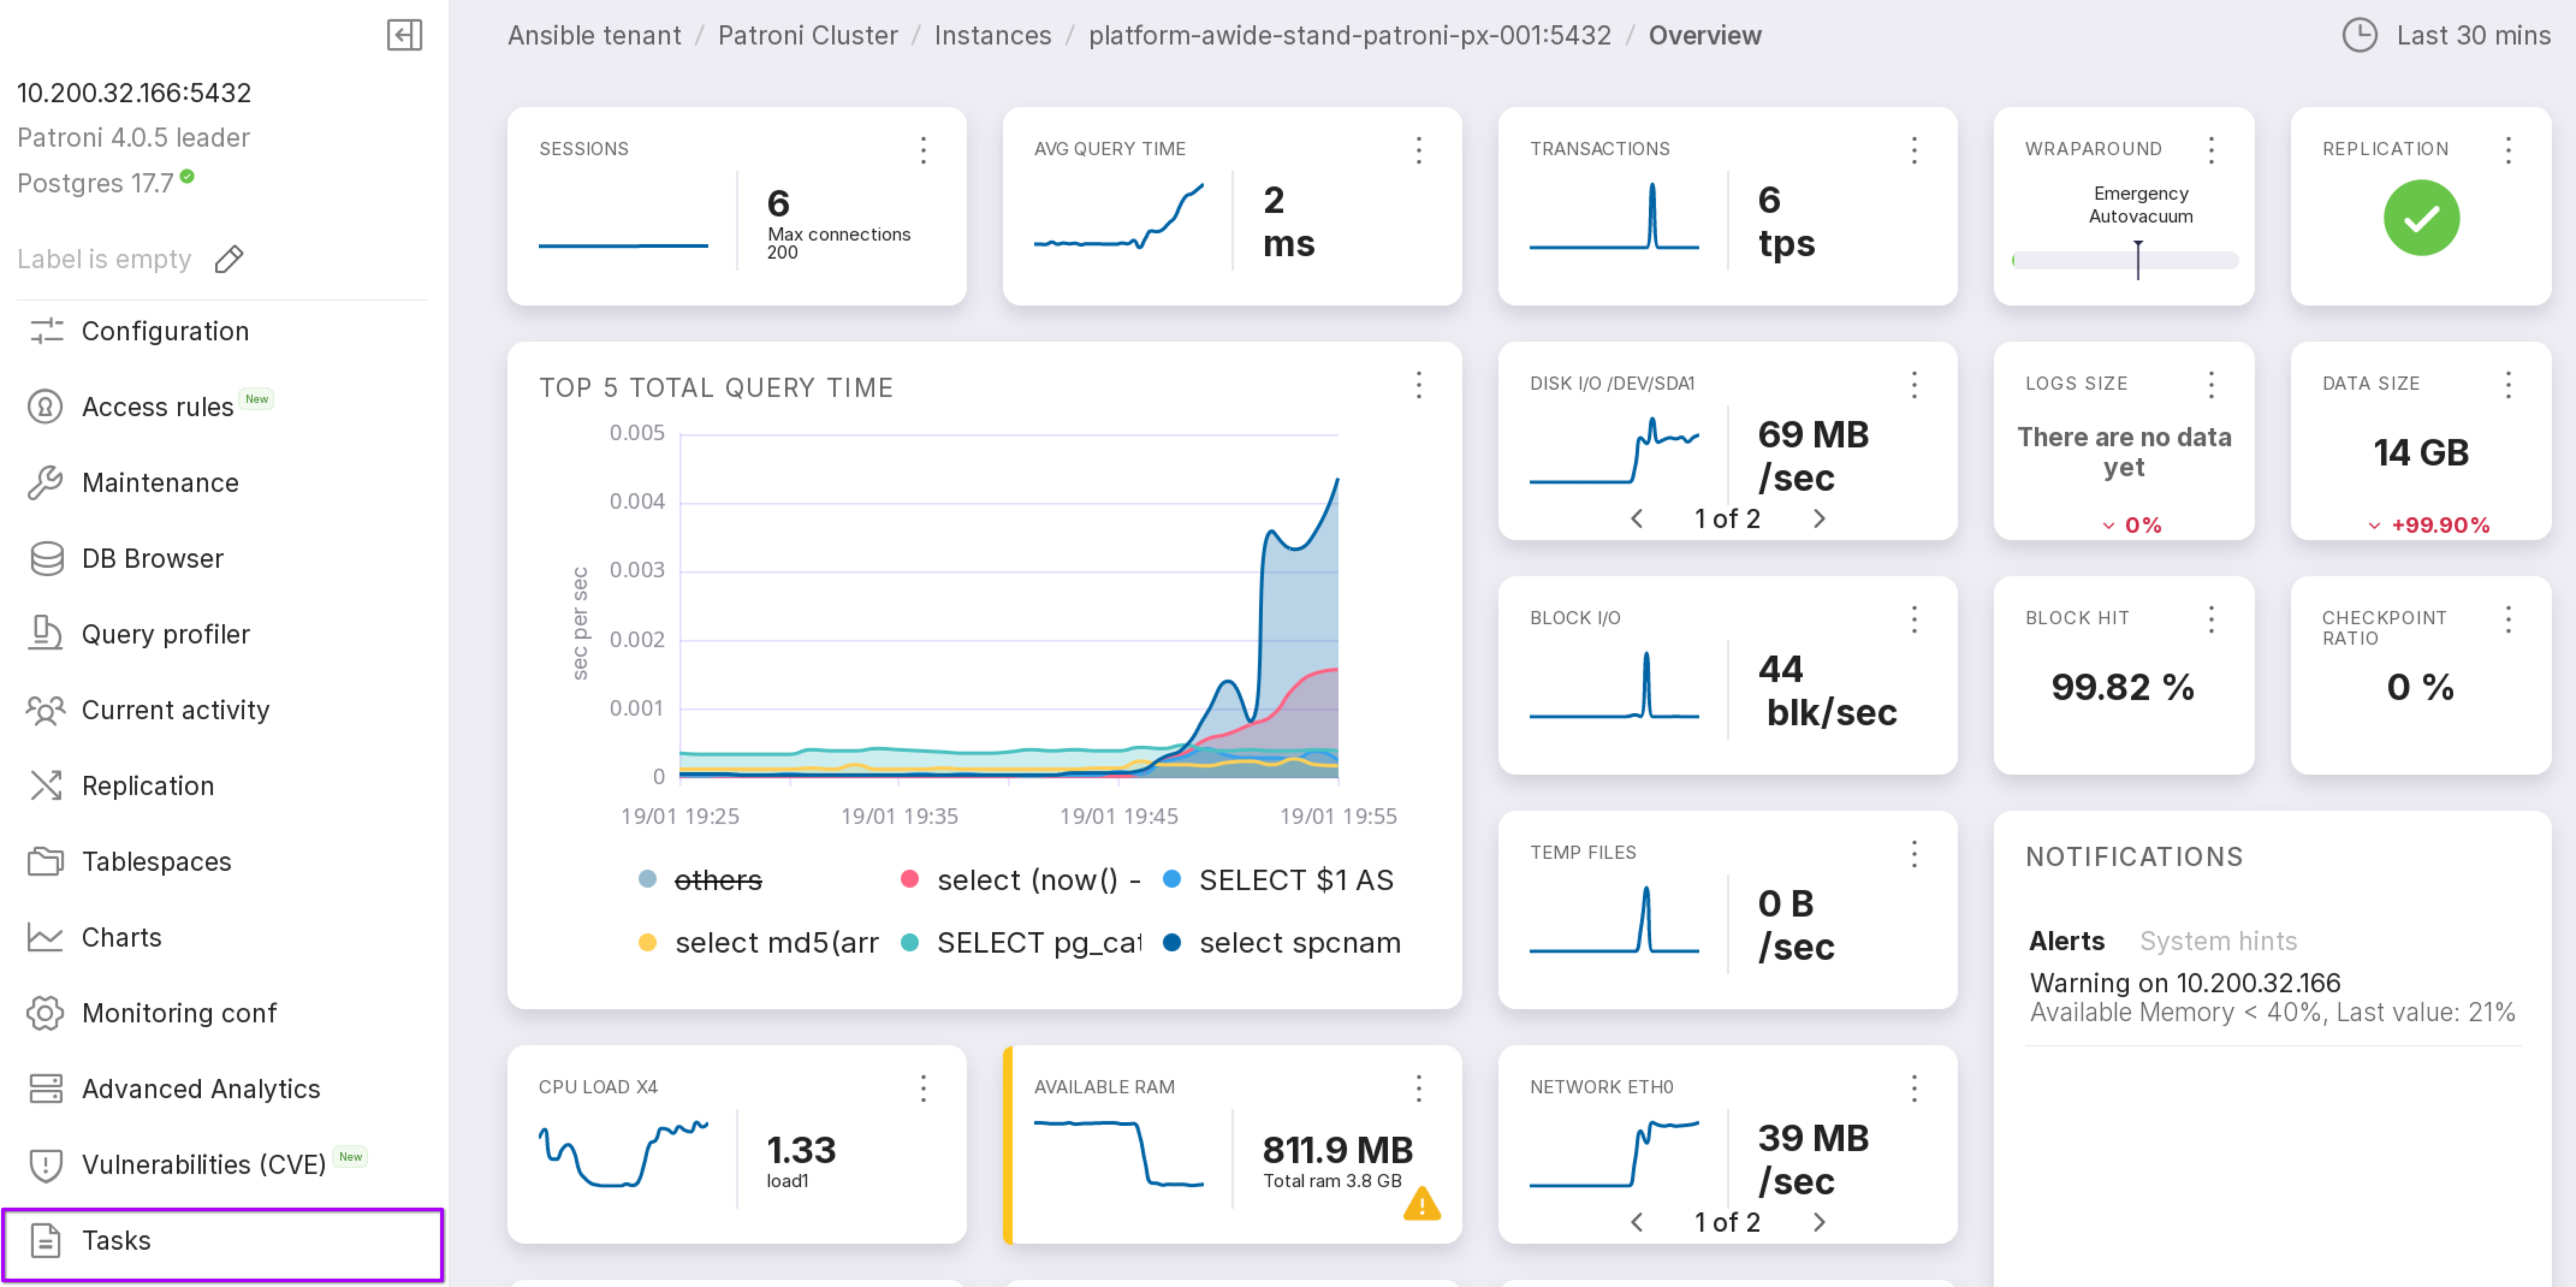
Go to the instance → “Tasks” in the left menu panel.
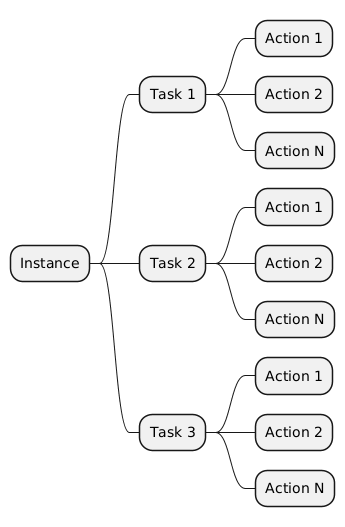
Each row on the “Tasks” page is a task that needs to be performed with the instance. A task is a container consisting of actions. Instructions for adding actions to tasks can be found at on the “Actions” page.

For clarity, below is a diagram of the interrelationship between tasks, actions, and instances:
Creating a task
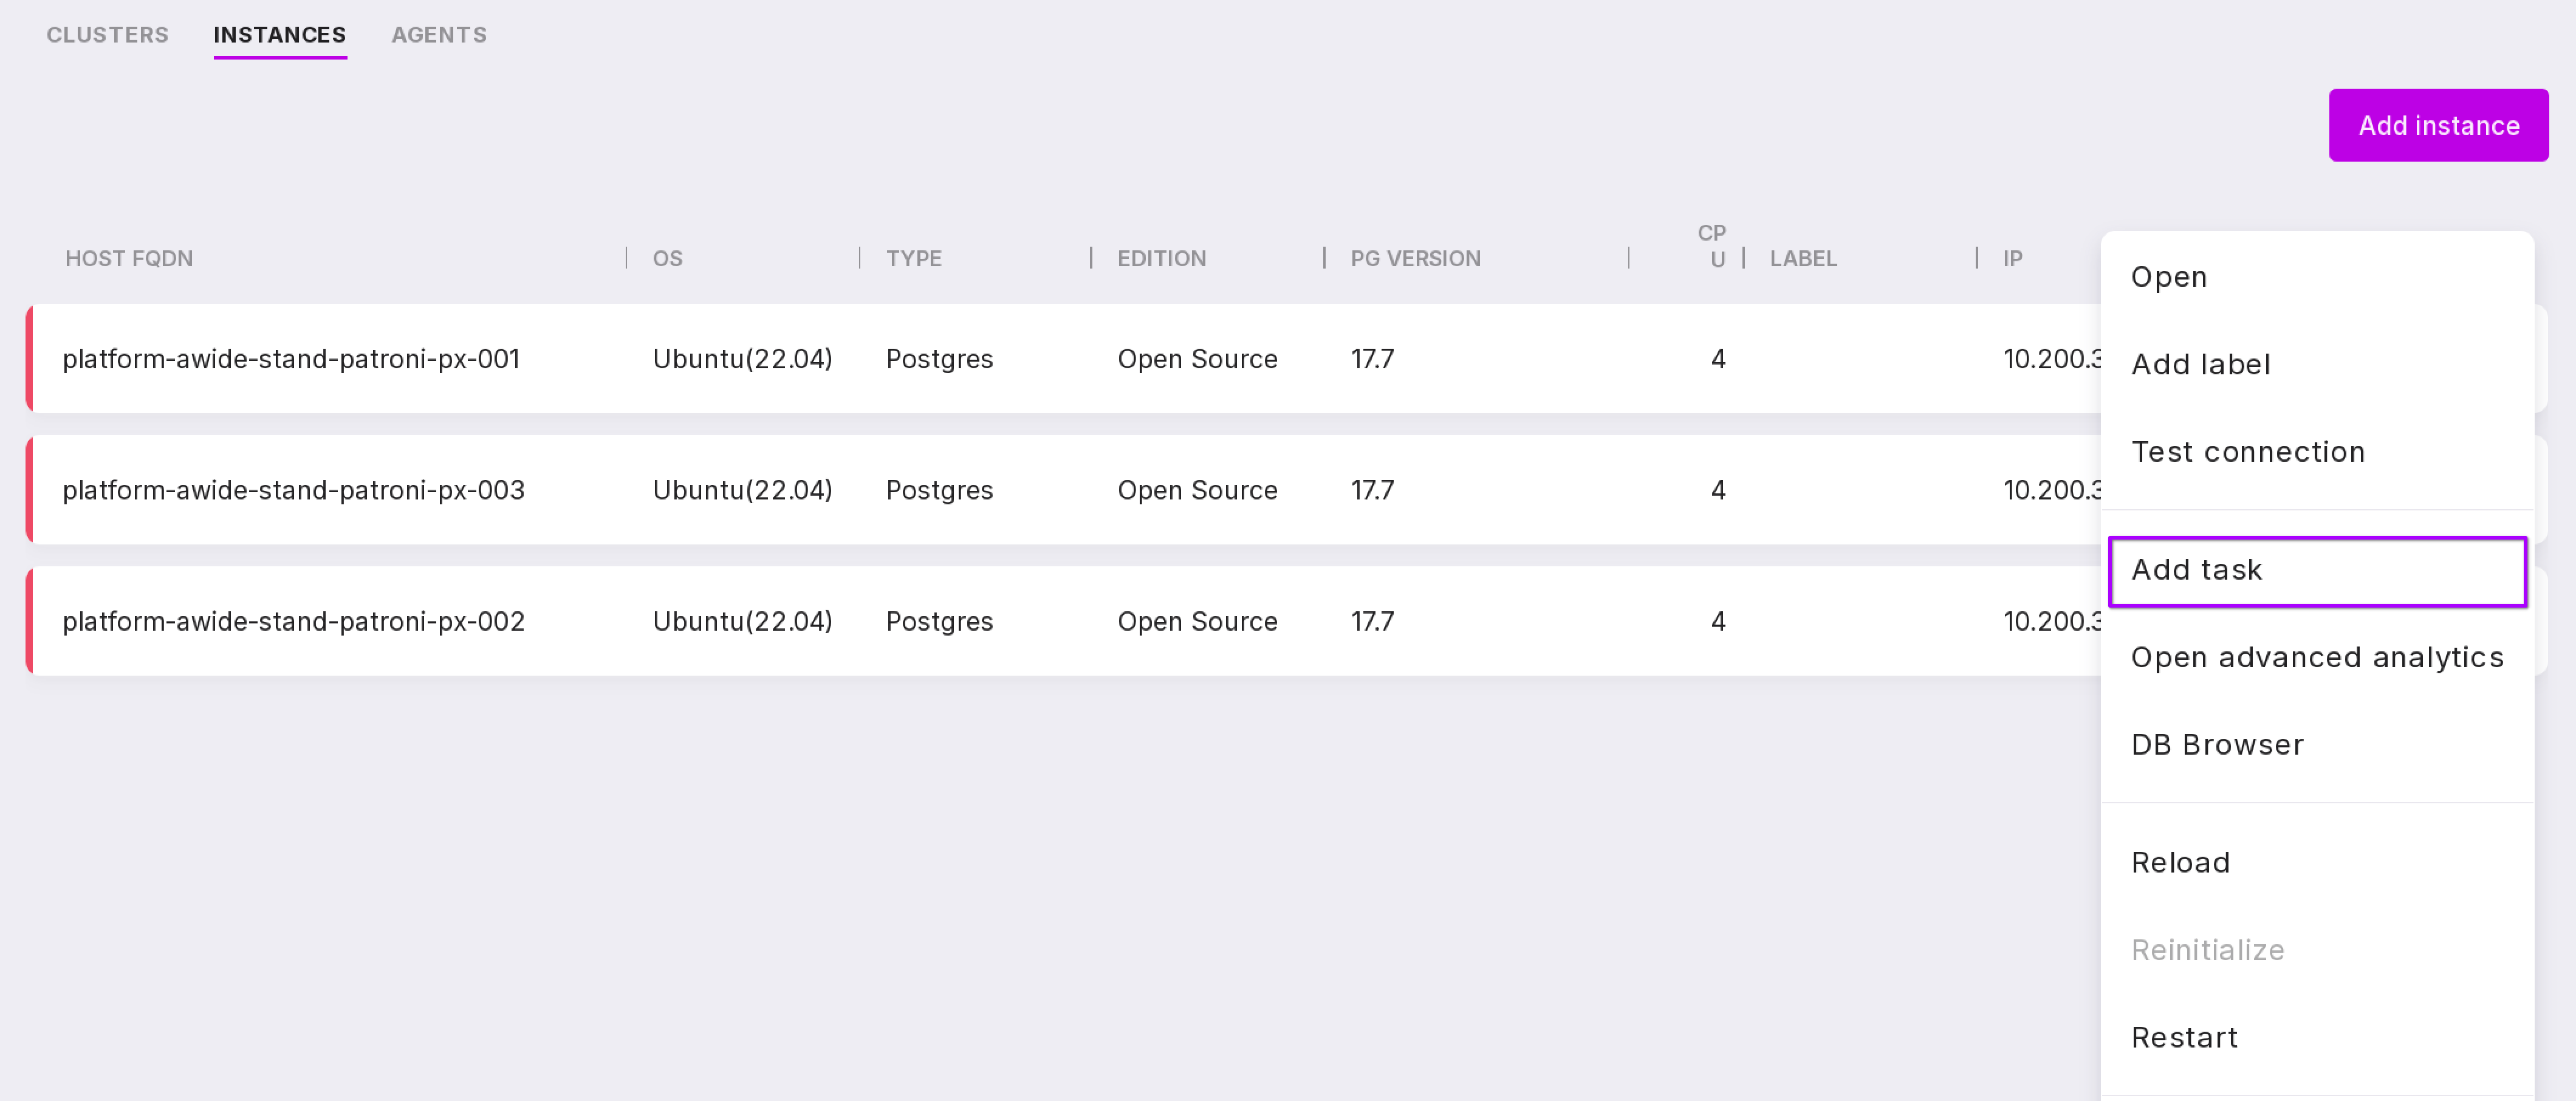
To create a task, click “Add Task” in the upper right corner of the page.

You can also create a task in the instance menu → “Add Task.”
When you click the button to create a new task, a modal window opens:
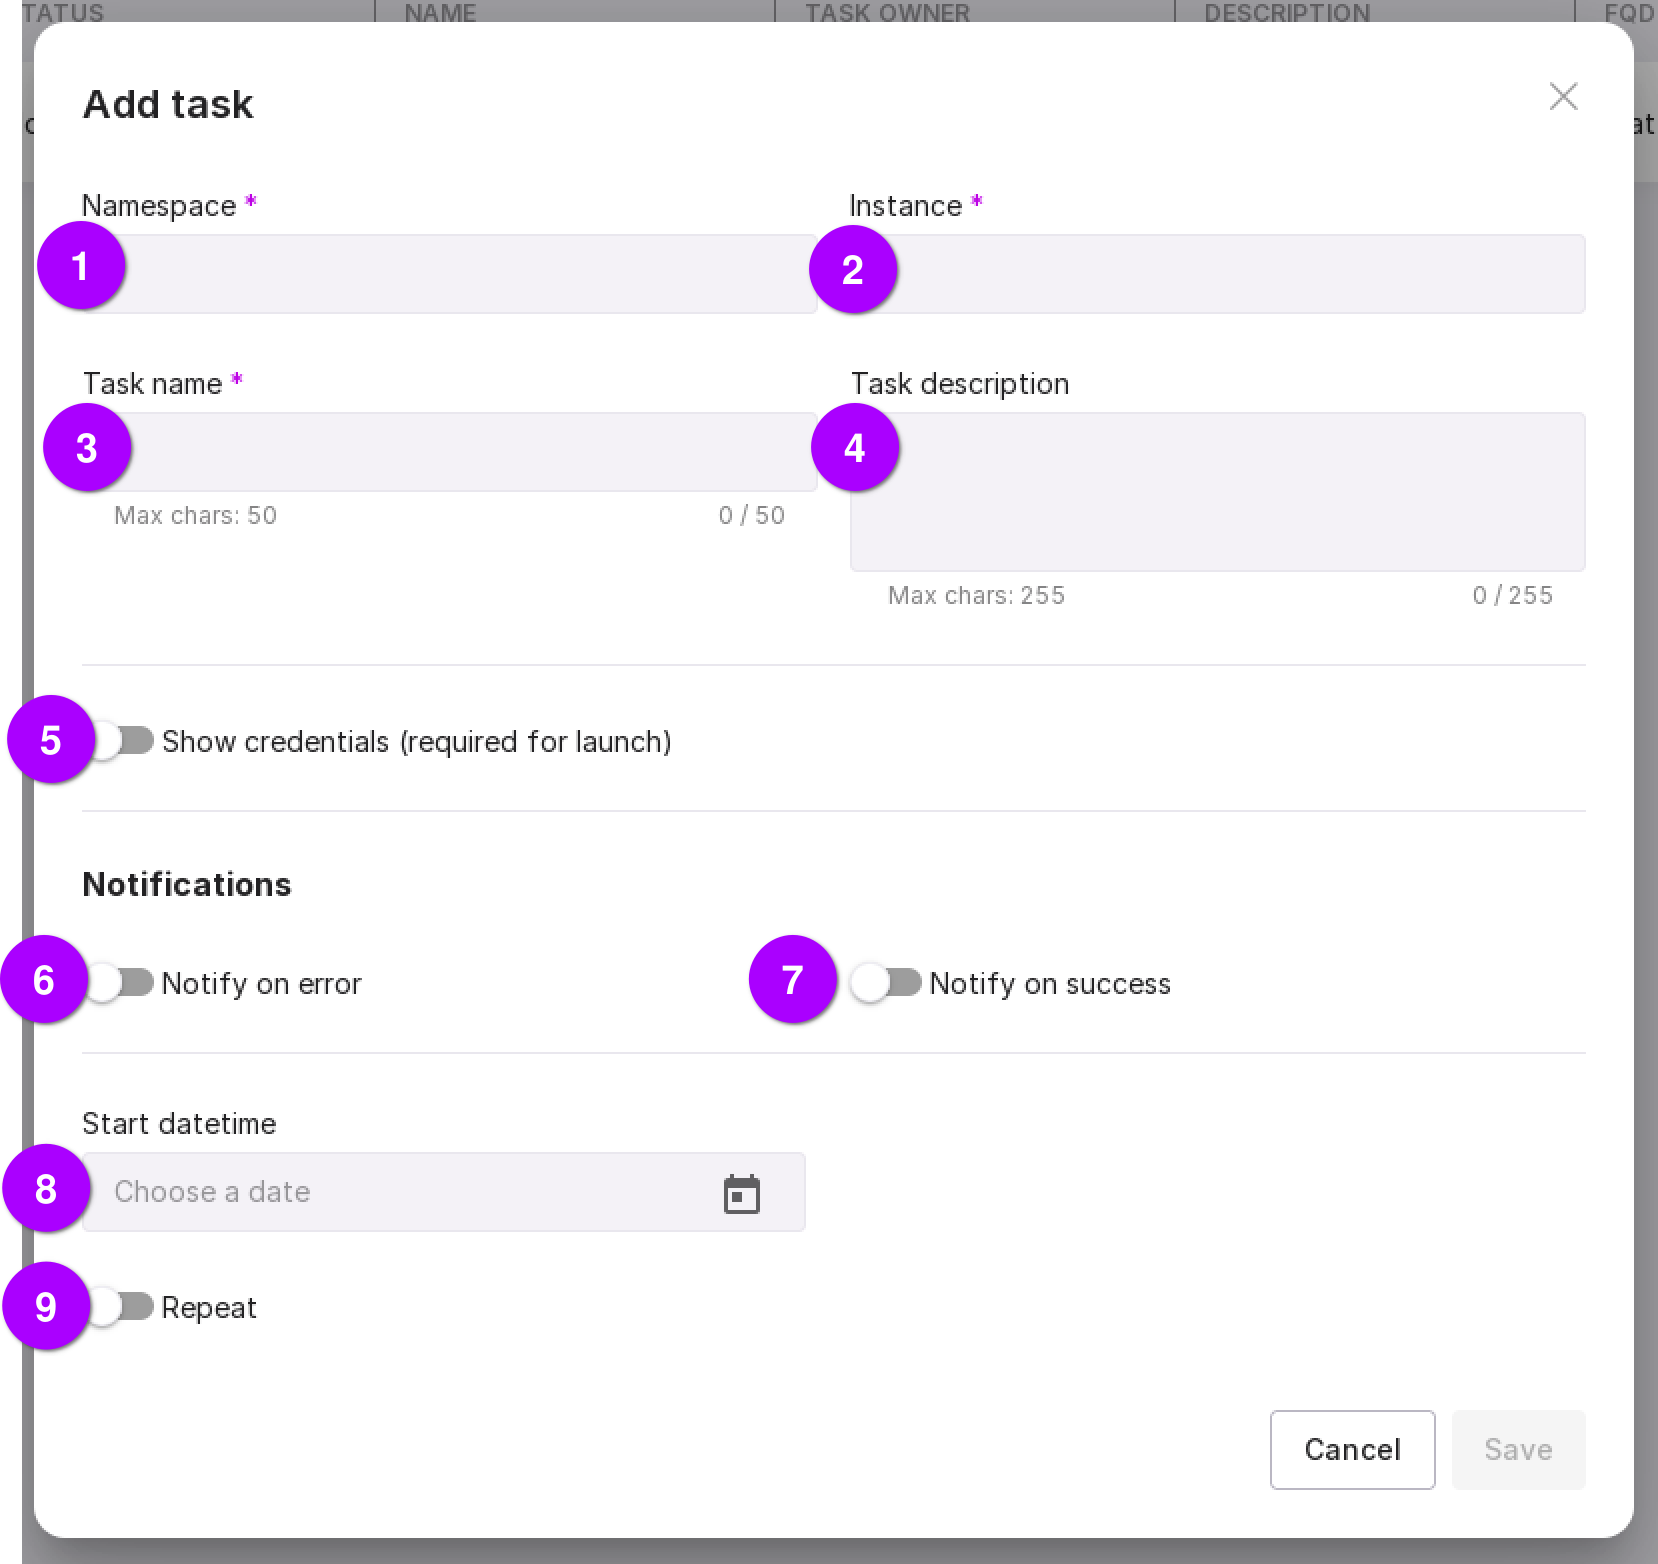
To create a task, fill in the following fields:
Namespace for which the task is being created.
Instance for which the task is being created. You can delete the specified instance and select another from the dropdown list.
“Task name” — type in the name of the new task. The length of the name must not exceed 50 characters.
“Task description” — enter the task description if necessary. The description must not exceed 255 characters.
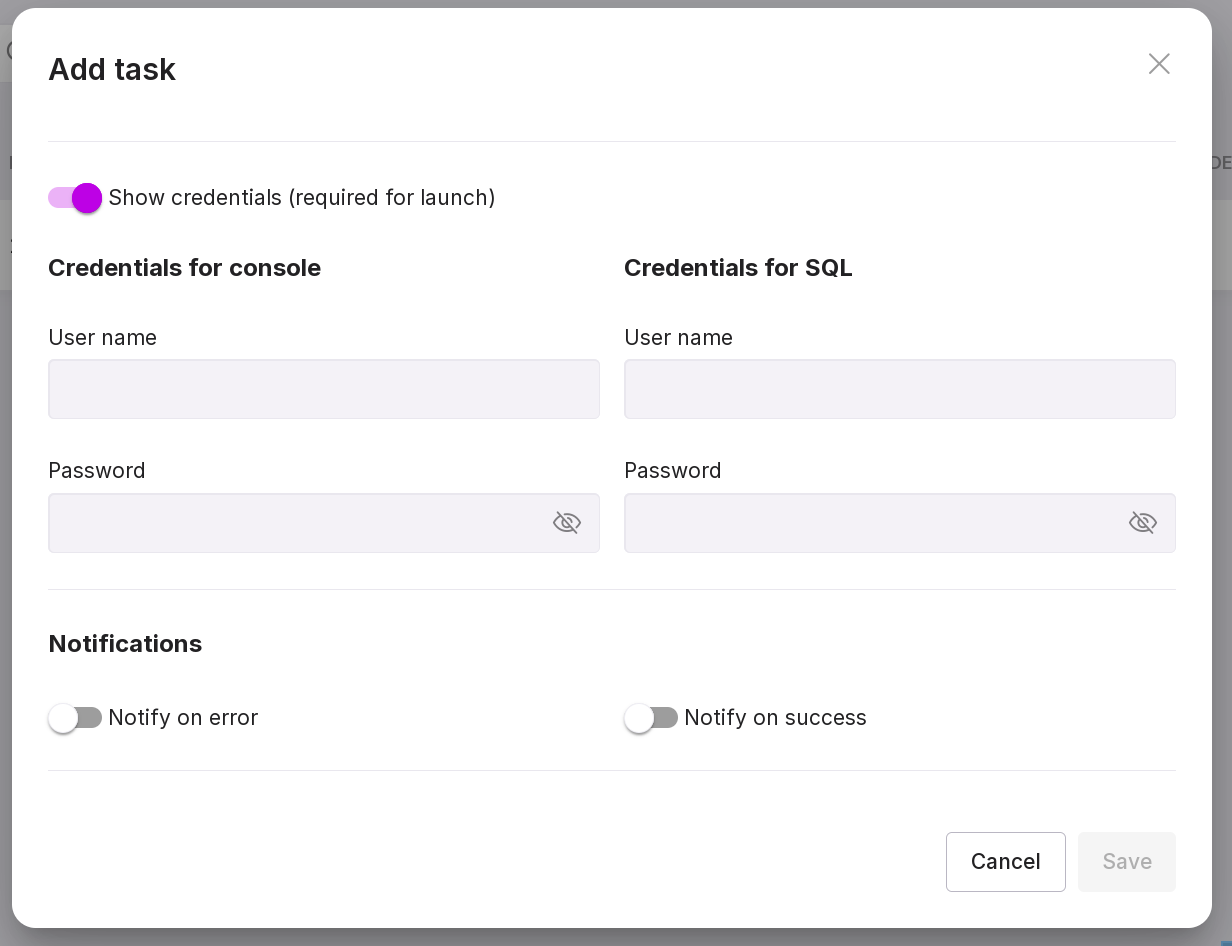
“Show credentials” — the switch opens additional fields: credentials for console and credentials for SQL. This data is required to perform actions within the task. If they are not filled in, the task will not be completed.
Fill in “username” and “password” in the “CLI Access” block if system commands are added to the task.
Fill in “username” and “password” in the “SQL Access” block if SQL queries are added to the task.
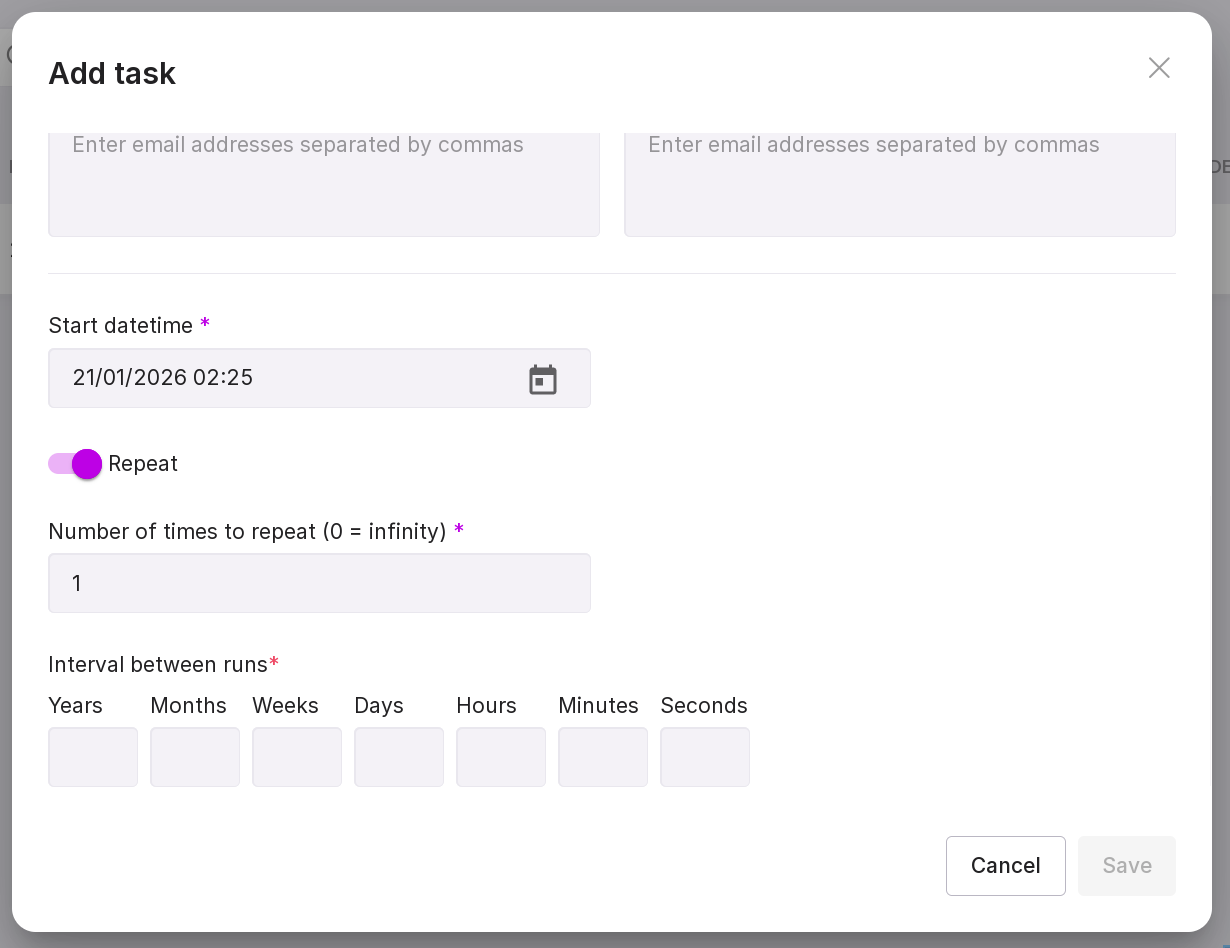
“Notify on error” — this switch opens an additional field where you can enter email addresses separated by commas. A notification will be sent to the specified addresses if the task state changes to “Error.” For the notification to be sent, you need to select “Stop task” in the “In case of error” field when adding an action within the task.
“Notify on success” — this switch opens an additional field where you can specify email addresses separated by commas. A notification will be sent to the specified addresses if the task state changes to “Successful.”
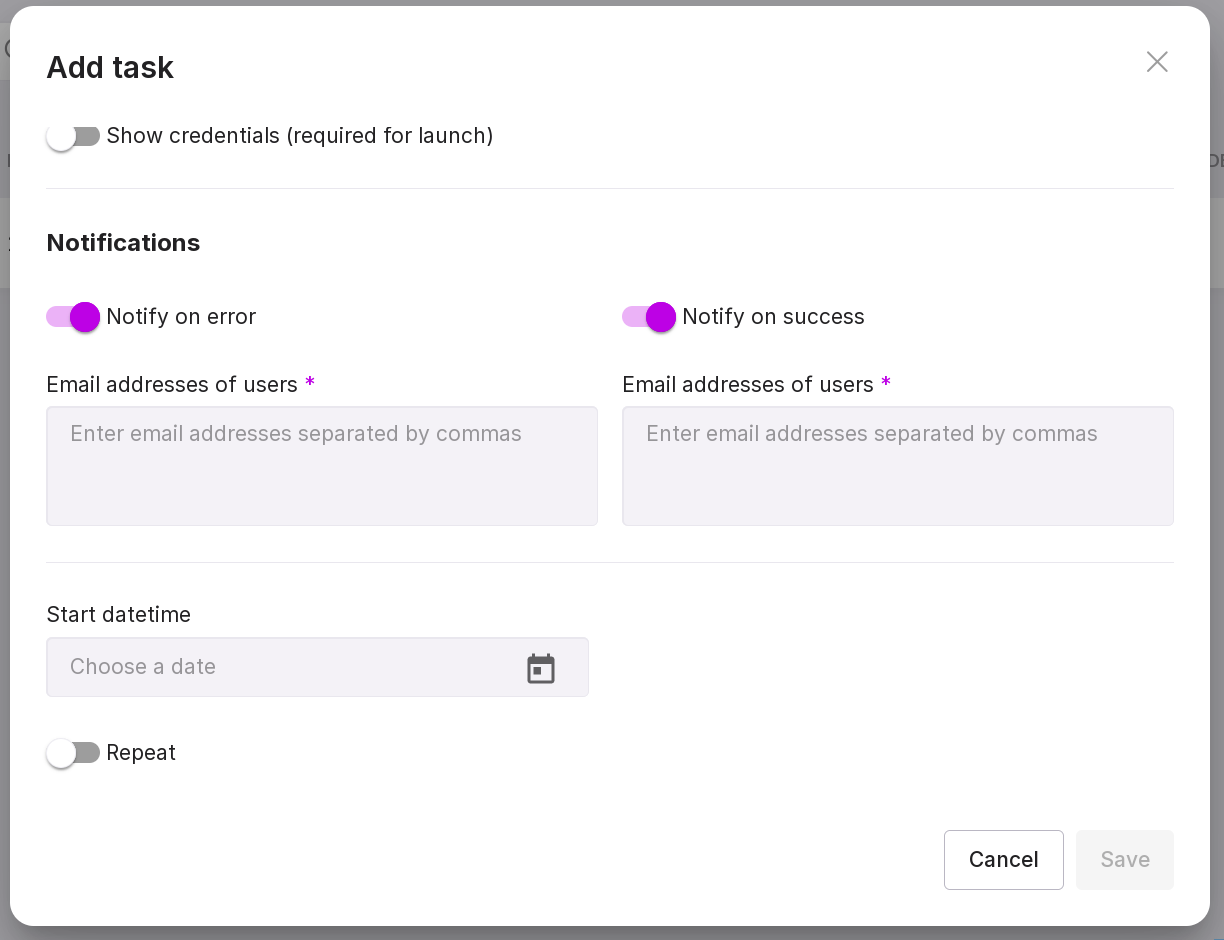
“Start datetime” — select the date and time to start the task execution. If the task should not be repeated, the field can be left empty. If the field is not filled in, the task state will be “not tracked.” You can set the date and time in the following ways:
manually enter the date and time in the format DD/MM/YY/ hh:mm;
select the date and time in the calendar that appears when clicking on the calendar icon in this field. Time can be selected using the up and down arrows, or entered manually by clicking on the hour or minute field. To save the result, click on the checkmark in the lower right corner.
If the task needs to be executed only once, leave the “Repeat” switch in the default position (“Off”). If the task needs to be repeated at a certain frequency, move the switch to the right position (“On”). In this case, additional fields will appear below:
the number of repeats. A value of zero means infinite repetition;
the length of the time interval between task repetitions. In the fields of the corresponding units of time measurement, this interval can be entered in years, months, weeks, days, hours, minutes, and seconds. Redundant fields can be left empty.
After entering all parameters to create a new task, click “Save”. To see the created task, refresh the page using the “Refresh” button.
Task Information
Let’s review the task information presented in columns:

“Is active” — shows whether the task is currently active. Click the switch to deactivate the task;
“id” — task identifier;
“Status” — the state of the task, indicating what stage of execution it is at;
“Name” — the name of the task;
“Task owner” — the name of the user who owns the task;
“Description” — the description of the task;
“Port” — the port of the instance for which the task was created;
“Creds for CLI” — if the column is checked, it means that the fields “Username” and “Password” for the console are filled in for the task;
“Creds for SQL” — if the column is checked, it means that the fields “Username” and “Password” for SQL are filled in for the task;
“Last Run” — the date and time of the last task run. If the task was completed with an error, the value of this column will be highlighted in red;
“Next Run” — the date and time of the next task run;
“Actions” — the number of actions created within the task. If the task has no actions, the value of this column will be highlighted in red, as the task cannot be completed if it does not contain actions;
“Runs” — the number of times the task has been run.
“launched by” — the type of task launch: user or timer.
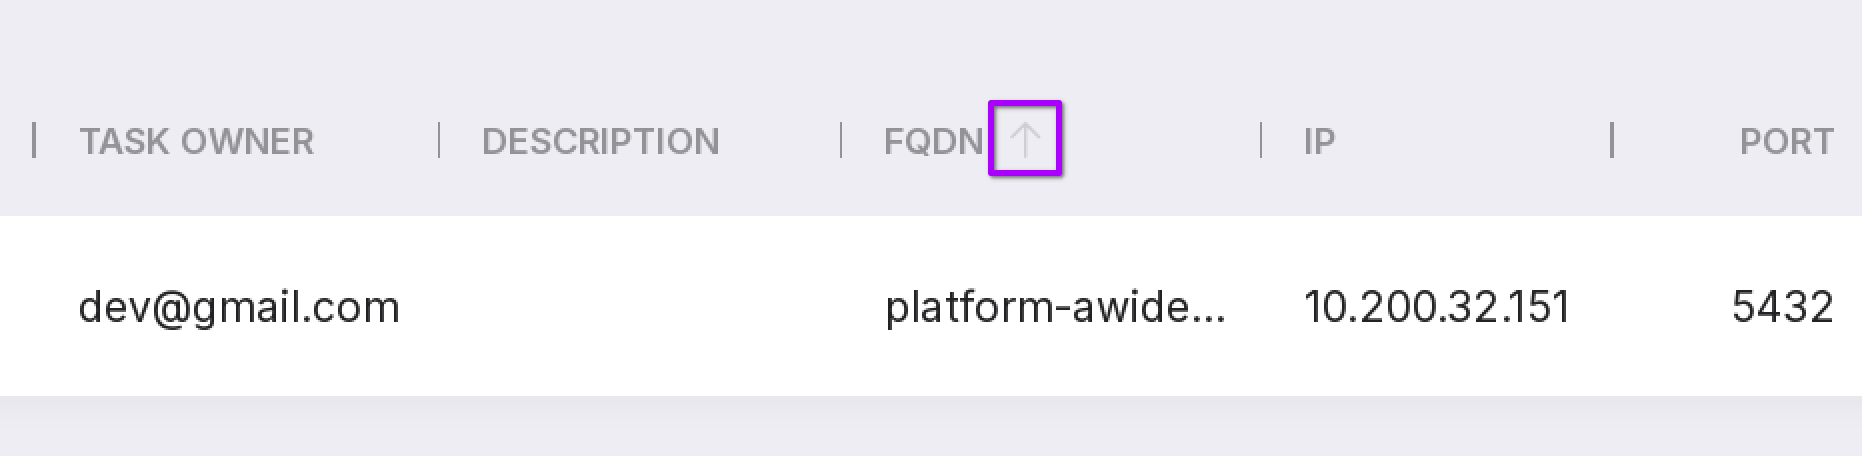
When hovering the mouse cursor over some column names, an up arrow will appear, which can be used to sort tasks by that column.
Task menu
Each task has a menu that can be accessed by clicking on the three dots to the right of the task.
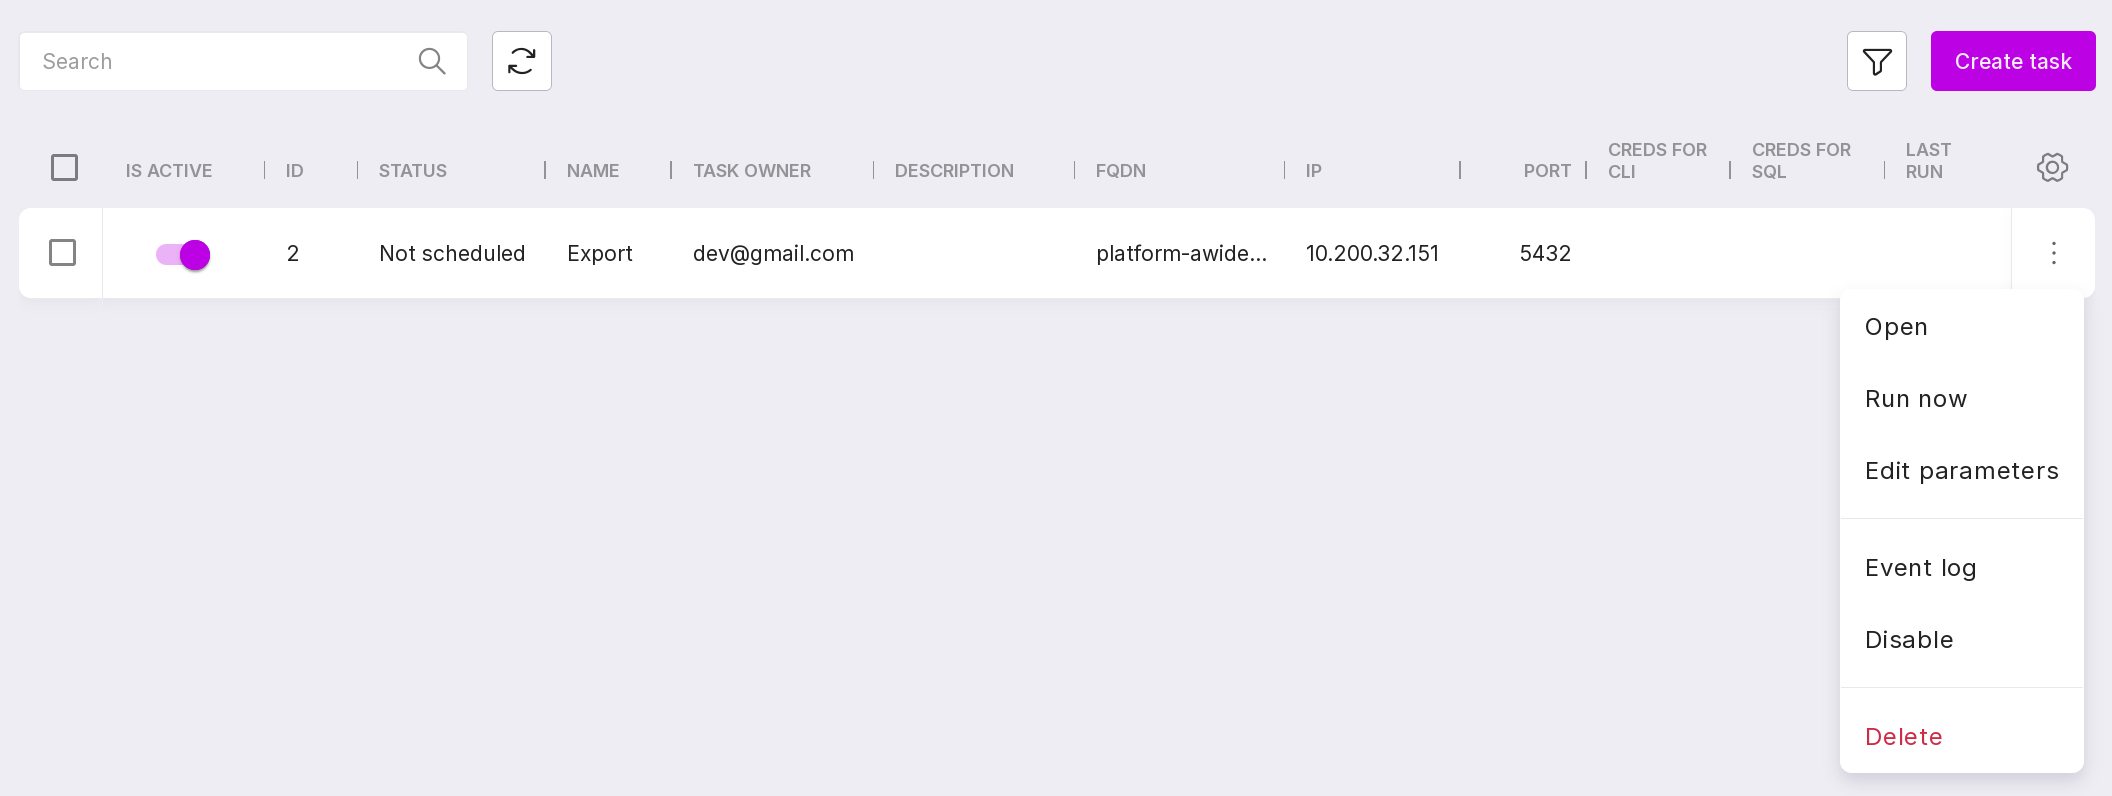
The task menu contains the following options:
“Open” — opens the “Actions” page;
“Run now” — starts the task;
“Edit” — opens the editing window for task parameters: instance data, task name, CLI and SQL access, start date and time of task execution, as well as data on its repetitions. If CLI or SQL access has been specified for the task, to save changes, you need to enter the password of the specified user.
“Event log” — opens the task execution logs;
“Disable” — turns off the task and makes it unavailable for execution;
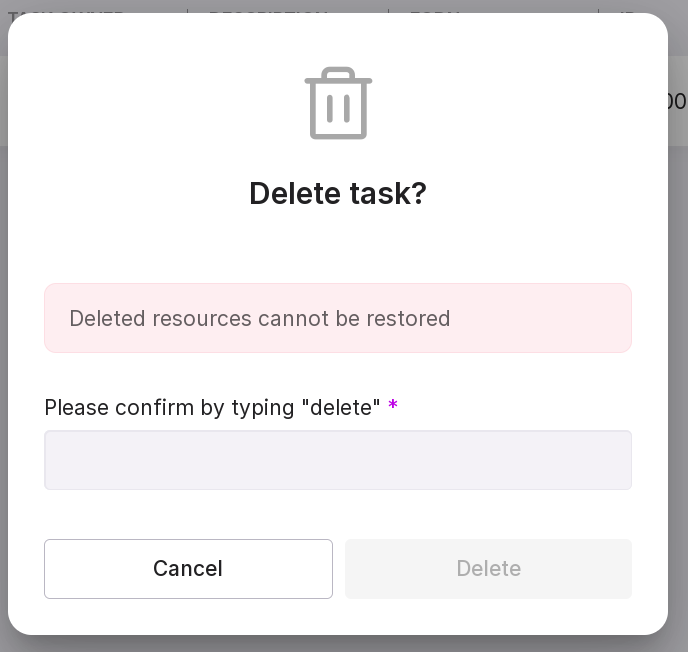
“Delete” — deletes the task. To confirm deletion, type in “delete” in the pop-up modal window.
Actions with tasks
If you check the checkbox to the left of the task, actions that can be performed with tasks will appear at the bottom of the screen. To check all tasks at once, click on the top checkbox.
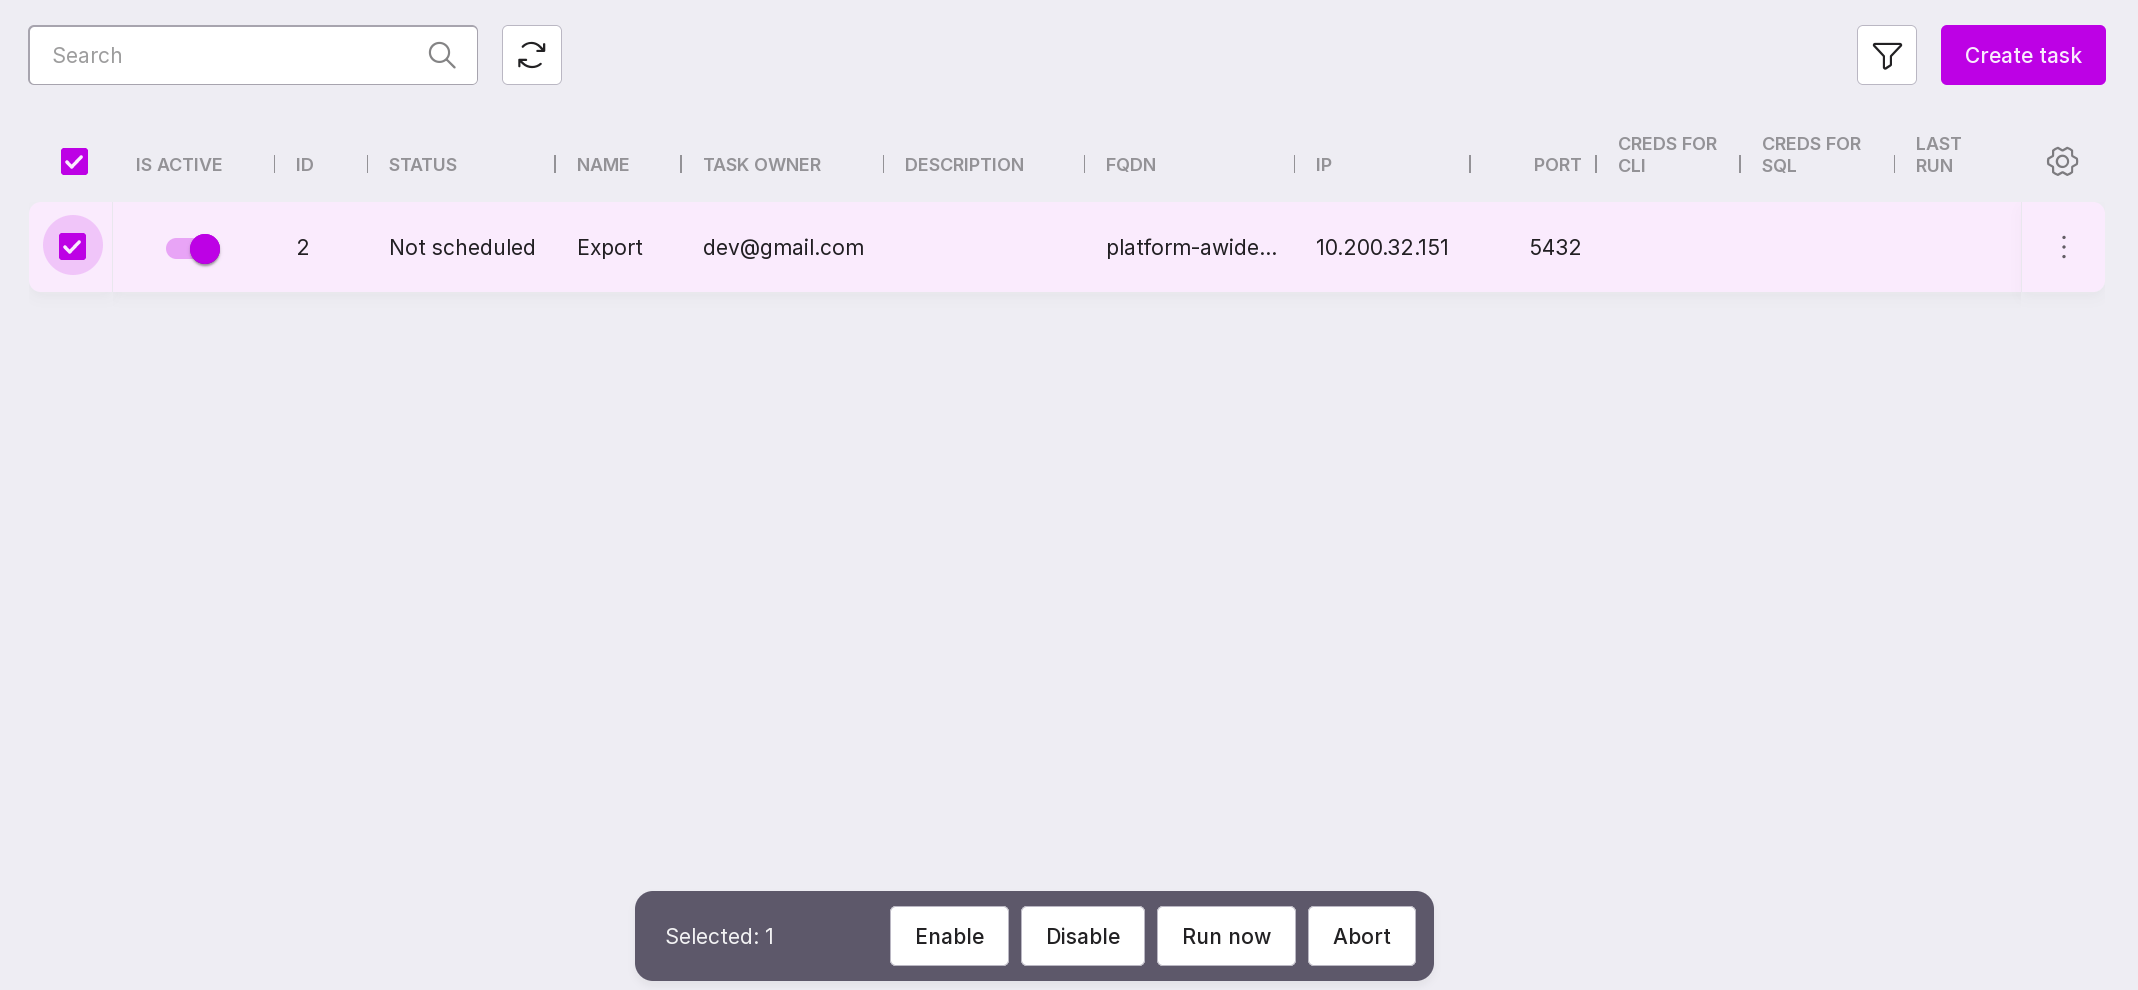
The following actions are available:
“Enable” — enables all tasks checked by checkboxes, regardless of their current state.
“Disable” — disables all tasks checked by checkboxes, regardless of their current state. Such task containers become gray.
“Run now” — allows you to run the task manually, rather than scheduled.
“Abort” — interrupts the execution of the task.
Note
Actions within the task cannot be executed separately — only the task can be started. When the task is started, all actions contained within it are executed sequentially. The actions are run from top to bottom.
Task filtering
Tasks can be searched by names using the search bar. Filters can be used in the search:
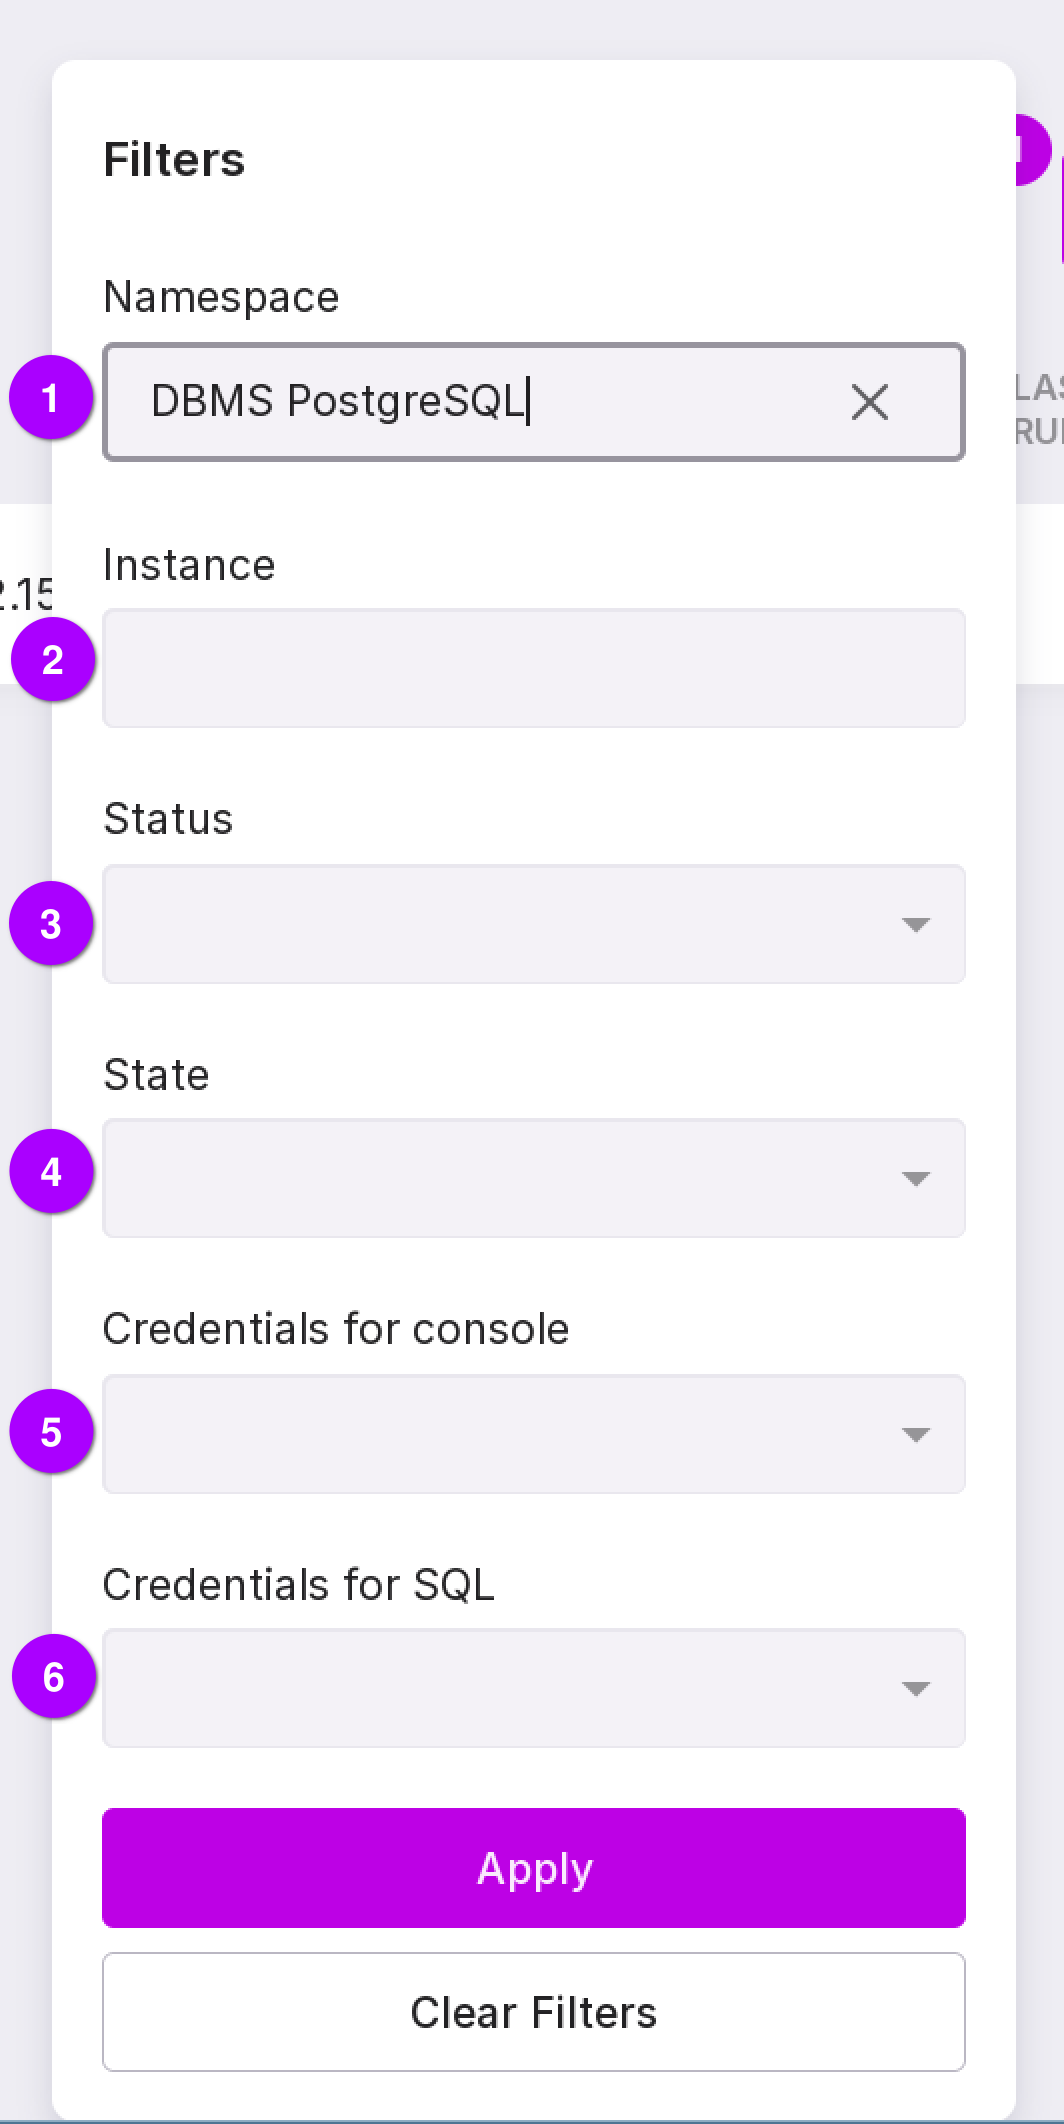
The following filters are available:
Namespace — in the dropdown list, you can select the namespace for which tasks have been created.
“Instance” — in the dropdown list, you can select the instance for which tasks have been created.
“Status” — in the dropdown list, you can select the status of the task:
“Scheduled” — a task with a set start time and recurrence data (if any);
“Not scheduled” — a task without a set start time and recurrence data (if any);
“In progress” — a task in the process of execution;
“Success” — a successfully completed task. If there were errors during execution, they were ignored according to the settings;
“Aborted” — a task that was interrupted during execution. You can interrupt the process using the “Interrupt Now” menu button;
“Timeout” — a task that was interrupted due to exceeding the timeout for its execution;
“Error” — a task that was executed with errors;
“Awaiting exec” — a task that has been scheduled for execution but has not yet been executed;
“Unknown” — a task for which the status cannot be determined. This may indicate that something is malfunctioning.
“State” — you can select the state of the task from the dropdown list:
“Disabled” — all disabled tasks, unavailable for execution (displayed as dimmed gray containers);
“Enabled” — all enabled tasks, available for execution.
“Credentials for console” — you can select whether the username and password for the console, under which the task will be run, are specified or not in the dropdown list.
“Credentials for SQL” — you can select whether the username and password for SQL, under which the task will be run, are specified or not in the dropdown list.
You can clear all filters using the “Clear Filters” button.
At the bottom of the page, you can configure the pagination of the page. To do this, select a convenient number of Tasks to be displayed on one page from the dropdown list.
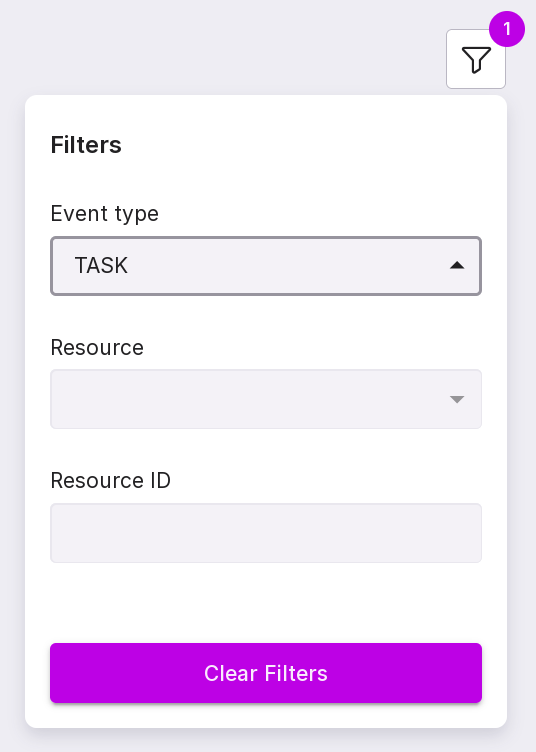
Event Log
You can view all scheduled tasks in the Event Log. To open the Log, select “Event Log” in the left panel.
In the event filter, in the “Event Type” field, select “TASK”, and all tasks created during the specified period will appear on the screen.